Pages

Wednesday, March 30, 2011

Ho-Hum

My last post went into detail about my new sewing project with my kiddos- Hope for Japan bags/iPod cases.  Guess what?!?!  As of this morning, we have $850 worth of merchandise made to sell to staff and students.  How exciting!  I'm running a mini sweat-shop/assembly line in my classroom and, at one point, spent 3 hours straight hunched over a serger sewing darts and finishing seams.  Yowza!  Between the runs to JoAnn fabric and Walmart for fabric, thread, and other supplies, it's been nuts-o.  Let's just say it's 6:45, dinner is still cooking, and I am blogging.  Go figure.

Oscar's new obsession in life is plastic Easter eggs.  He bats them around, runs around with them in his mouth, plays with them until he opens them, and ditches them.  He won't play with them until we close them back up and the cycle continues.
The dozen opened eggs strewn around the house is starting to drive me crazy.  The laundry is piling up and the dishes stay in the sink overnight- school.is.taking.over.my.life.

I have a 35 minute commute to work and, despite the gas costs, I actually enjoy it.  It gives me time to lesson plan (you heard it!!  I lesson plan in the car sometimes and get random ideas, then hurry up and run inside when I get to school and jot them down... works rather well!), think of meals to cook the next week, and reflect on things going on in life.  My drive this afternoon?  Family.

I absolutely adore my family- both sides of it.  My family is so.. well.. me {make sense?  never!}.  Perfect example:  I am the total opposite of a germ freak.  I. will. use. your. toothbrush.  Then I will leave you secret notes about how I used only after I know you have used it again.  Muuuhahahaha.  We were moving my brother into his new house and the only thing that was in their fridge to drink was a 2-liter of Root Beer, no cups.  We "took one down and passed it around" and all drank from the same 2-liter, with the exception of my husband.  Hoosiers?  Yes.
I am the middle child and have an older brother and younger sister.  We grew up in STL, Europe, and Kansas.  We love each other.  We tease, play pranks, and take embarrassing screen shots while we Skype.
A little edit-hilarious!  This is my Momma =)

I don't know who I'd be without them.  I wish we all lived together, but our visits are so sweet.
This is us!

I love my husband's family, too.  He is the oldest of 5 and I love every minute we get to spend with them.  I don't think I could have prayed for a better family to choose to be in.  I can't speak for them, but I think they love me =)  At least I hope they love me half as much as I love them.

If it looks like we have a lot of fun, you're right- we do.  I'm not sure what made me think about my family today.  Maybe it's because I miss them, maybe it's because I'm in the mood for a good laugh.  Either way, all 13 of them are the perfect cure.

I have no project today, but I do have a recipe.  My mother-in-law makes this, but I'm not sure if this is exactly her recipe.  I forgot to ask her how to make it, so I just made it up from memory.

Sveeeeeeeeedish Meatballs =)

Meatballs:
1 lb ground beef/turkey
3/4 cup bread crumbs
Salt/Pepper to taste
Onion Powder
Garlic Powder
Chili powder- Pinch!
Red Pepper flakes-Pinch
1 egg

Sauce:
2 cans cream of mushroom soup- I used 3 because I like a lot of sauce, and I used fat free soup.
1/4 cup fat free/low fat sour cream
1/4 cup milk
Dash of worcestershire sauce
Dash of hot sauce

  • Mix all meatball ingredients together and shape into balls.  I made about 16 from this recipe.
  • Bake at 375 for 20 minute or until meatballs are almost done.  You can also saute them if you are in a rush!  (I think you can cook them raw in a crockpot with the sauce, but I like to pre-cook them so I can dispose of grease)
  • In a bowl, mix all sauce ingredients until blended.
  • Place all meatballs into a greased 8*8 dish  and pour sauce on top.
  • Bake for 40 minutes at 375.
Done!  I served it with mashed potatoes and steamed broccoli.  The sauce was a great gravy and was super yummy over the broccoli.  We haven't had this for a while and it was perfect.

OKAY, now off for some serious cleaning and organizing of the house.  Daniel is busy assembling our new eliptical, so I'm sure the basement is abundant with teeeee-rash.  I don't even want to look.

Here is a teaser for my next project... what do you think it will be???

P.S. Excuse the present condition of the blog.  I am addicted to change, so I keep playing the the layout and headers and I'm still working.  Don't judge!

Wednesday, March 23, 2011

Hope for Japan

My job is ridiculous amazing.

I teach kids how to sew (and cook healthfully and properly, but sewing is my fav!).

While you think it might seem easy, it's not.

Take a hike, sister.

I adore it, but it can be frustrating.  Constantly.  You begin to wonder if 1.  They even listen to a what you are saying and 2.  Why on earth they think the way they do.  I mean really, who thinks of these things?

But... at the same time... it's so much fun.  And rewarding.  And totally worth it all.

My students are at somewhat of a turning point in the semester- one class is well into sewing through projects and getting better with each day, and the other is about to start their first sewing project (in this class, we were previously learning about nutrition and food prep.  Such a fun class!).  I felt like we needed to change things up a little bit from last year and throw a curve-ball into the schedule.

In our in-service on Monday (ya, Monday in-service right after Spring Break.  Best. Idea. Ever.), we talked about service-learning projects and ways to serve the community while still practice the skills and curriculum we teach in good 'ole fabulous Family and Consumer Sciences (have I told you I love my job?  Seriously, can't tell you enough.  It. completes. me.).  It was fresh in my mind Tuesday morning and I thought, "Hmmmm, we should do something for Japan!" 

I called every crisis relief agency known to man in this town and no one accepts donations besides 1. CASH MONEY and 2. Care kits (basically non-sewable items like toiletries).  I talked to Cheryl, a.k.a. FACS goddess, who happens to be my partner in crime and fabulous mentor (cannot even begin to tell you how thankful I am to work with her!), and we came up with a project we could make with the students and sell, then donate the money.  This is what we came up with.

Tote bags and iPod cases (we surveyed our students to see what they would want to buy- go figure!) are being made from canvas with an ironed-on decal of our "logo".  It is the Japanese symbol for "Hope", and our campaign is conveniently called "Hope for Japan".  The idea behind the design is basic and simplistic so that the focus is on Japan, not the bag or case.

My classes will be frantically making these this week and next, then selling them April 4th through the 8th to their peers.  It's a easy-peasy pattern, but still- we're talking 13 and 14 year olds with about 2 months of sewing experience (can you say psycho?!!?).  If I don't blog for 2 weeks, this is why.

My classroom is being transformed into a sweat shop.  For bags.  For iPod cases.  For Japan.  I love it!

Here is the logo:

Here are our products.  They are crazy adorable.

Hobo Totes are $7, iPod cases are $5.  If you want one, let me know!  I will keep updating on how much we're raising- so far we have $100 in orders, and we haven't even started!  Ahhh!

I'll leave you with our "advertisement" video being shown at school to the students to encourage them to donate. It's better full screen or bigger if you can get it there, but you get the point.
And keep in mind, this is for middle schoolers.  =)


Friday, March 18, 2011

High on Thirft

I get a total high from going to thrift stores and finding great deals.
Seriously, you'd think I was on drugs.
I usually come home, put it in its spot (as long as it doesn't need re-doing!), literally dance and sing (very poorly) throughout the house.

This week (my Spring Break- seriously, being a teacher is a primo gig, especially a FACS teacher), I ventured with my sister-in-law to several thrift stores, discount stores, and went on a "hunting" trip through the neighborhood on Wednesday night, under the disguise of darkness, before trash was picked up the next morning.

We. Cashed. In.

Exhibit A:  Bargain Haus in Lees Summit
Barely used, perfectly running Craftsman Lawnmower for $50.  We were hoping for something a little cheaper at a garage sale, but last year we couldn't for the life of us find a lawn mower at a garage sale.  It was in mint condition and is like new- we love it (correction, Daniel loves it)!

Wowza, do I love this man!
 Exhibit B:  Huntin' Trip!

Laughed so hard this night that my abs hurt.  Daniel supplied us with some flash lights and we cruised through the neighborhood for finds.  We also Cashed in in our opinion.  Kaleigh found a matching chair for their kitchen table (that only has 3 chairs currently thanks to a stink in Lawrence... Boo KU!), 3 perfectly good but dirty (hose, anyone?) plastic patio chairs, and a utility cart to go between their washer and dryer (not pictured).  All for $Free.99!

Exhibit C:  Salvation Army in Lees Summit (by far the best finds of the week!)
We had some time to kill while running errands before Kaleigh had to be back to get her cable/internet installed in their new house (woo hoo!), so we ran to Salvation Army.  First of all, Don't tell my husband, I found a great bookcase with lots of potential- it didn't fit in the car, so we are going to pick it up tomorrow.  It is going to be amazing.  Only $17!  Then, I found this loot:
 I found matching candle holders, then this piece of glass across the store.  Put them together and we have a cloche (pronounced kl-oh-sh)!  It will have some goodies inside of it sometime soon.  I found one on Thrifty Decor Chick and didn't think to search for one- this stumbled upon me =)
Not as cute as TDC, but can't beat $3.50!
I thought I would refinish the candle holders ($2.96) and put new flowers in the holder, but you know what, I love them they way they are.  Awesome!  The black iron and glass shelf will lose the shelf and become a towel holder in the bathroom.  It's a little more narrow than the holes that are already there from the previous holder, so I will have to rig it up... I'll post when that gets done.Here is the mantle now- I don't know that it will all stay there (especially the picture frames- they were thrown up there when we moved in so they wouldn't break- we didn't have anywhere to set them to get them out of the way), and candles will be on the holders.  Love it!
Vase on the left will have some flowers, too!


The tall metal holder in the first picture is going on the back porch with my $25 (gorg) patio set and will be potted with something my husband picks out.  My likey! Now go and find something cheap! ***Update***My beautiful sister went to Goodwill in Charleston this afternoon after reading my post and this is what she got! 

Antique Heirloom butter churn:  $12 (looked online- it is worth over $100!  It is hand signed and dated.  You never know what you will find!)Fruit bowl:  $6 Candle Holders:  $6 for the pair (will be painted.  Apparently my dad wants them to be gold.  Tacky is he!)Glass Vase:  $2.  Flower is from Walmart, Better Homes and Gardens I think.

Thursday, March 17, 2011

{All Grown Up}


The Kurowski (and Gibson... and Becker) kiddies are growing up!

Daniel and I bought our first home in December and my brother and his wife just closed yesterday on theirs.  Chrissy (the crying one and the gorgeous one... go figure =D) lives by my parents in Charleston, South Carolina and Danny and Kaleigh have been staying with us until the close.  Want to know where they live?

Here is the view from their front porch:

They live two doors down from us and I. Love. It.  They've been staying with us since January and I have to say, I think I'm going to have separation anxiety when they are gone!  Oh well, guess I can look out my living room window and see them.. in their master bedroom!  Haha- I kid.  Creeeeepie!

They are the cutest!

I guess I can focus on getting this house lookin HAWT once they are gone.  Celebration project? 

Couch Pillows on the cheap!
First of all, I used the same fabric for the pillows that I used to cover the Thrift Store Chair a few weeks back.  It was originally very expensive, but I got it for less than $3/yard because of a clearance sale, coupons, and wam-bam-shazam teacher's discount! {I ask for one everywhere I go!  Even the Bargain Haus... you never know!!}
So, remember by totally legit bolt of fabric?
$18 for the entire thing.  So, for my 18 buckeroos I recovered a chair and made 8 pillows.  I also purchased the pillows from my favorite- the Bargain Haus in Lees Summit (which my sis-in-law thought was disgusting)- for $1 each and bleached them in my washer two or three times.  They are still fluffy and smell squeaky clean!


Seriously!  I can't take a picture without him being obsessed with being in it.  Love him!

They are soooo ugly, but they look like this now:

Actually, a few look like this.  I will post a different pillow tutorial tomorrow!

Here is what you need:
  •  Main Pillow Fabric- Keep in mind you have a front and back of the pillow!
  • 10 inches ruffle fabric (the fabric is usually 45-48 in wide, so it should measure 10in X 45in when unfolded.  This amount of fabric for the ruffles works for a pillow that is about 16 in X 16in.  I would say that if it is bigger than 20 inches square, you need longer strips of fabric for the ruffles.  The ruffles will be about a third of their non-ruffled size)
  • Thread!
  • Pillow to cover or stuffing
  • Hand Sewing Needle
Here is what I did:
  • Cut a front and back to the pillow.  I usually just use my measuring tape, measure out the length and width of the pillow, and cut through both pieces of fabric at the same time so that they are exactly the same size.
  • Cut strips for the ruffles.  I mentioned before that I like the way odd numbers look, so I sewed on 5 ruffles.  You can do as many as you want.  I took my fabric, measured out 2-inch increments (so 10 inches total) and cut my strips.  In the end, I had 5 strips that were each 2 inches by 45 inches {again, if your pillow will be more than 20 inches square when it is finished, you need longer strips!}.
This is folded up for picture reasons.  It is 45 inches long, I promise!
  • Gather your strips into ruffles.  Set your machine to do a running stitch- on my machine, the stitch length is on #5.  Most machines I've worked with are exactly the same.  Sew a single stitch from one end to the other, straight down the middle, without back stitching.  When you are done, take one end, pull on one of the threads, and your fabric will start to gather on its own.  Pull the gathers so that they are 1.  Gathered down the entire length of the strip and 2. EVEN.  How tight should the gathers be?  Mine were so in that the ruffled strip was about 3 inches longer than my fabric when done.

  • Take one strip and pin it to your fabric.  I start with the very center ruffle so that I can work outwards and make sure my ruffles are centered.  Once it is pinned, sew it to your fabric right over your gather stitches.  Backstitch at the beginning and end so that the ruffle doesn't come off (I tell my students that backstitching is like putting bookends on a bookshelf.  If there are no bookends, the books fall over.  If we don't backstitch, our stitches will "fall over" or come out.  They get it right away!).  Keep your machine on a running stitch, or the stitch length on 5.  It will make life easier.  ALSO- hint:  usually your machine will skip over your pins, so I always leave them in until I am done.  life. works. better. that. way.

The stitches you make to attach it to your fabric will disappear.  I don't even take out the gather stitches!

  •  Repeat with the other 4 strips of ruffles.  I put 2 on either side of the center ruffle, but I leave about an inch gap.  Attach the same way as the first.
  •  Attach the last 2 strips in between the center ruffle and the left/right ruffles, so that there are no gaps between them.  When you are done, you should have side by side ruffles with, like I said, no gaps between them.
  • Time to sew the pillow together!  Place your other pillow fabric piece face up on the table.  Place your ruffle fabric face down on top, so that right sides are together.  Pin and stitch together with a 5/8 in seam allowance, leaving a 4-5 inch gap on a non-ruffle side for turning.  Stitch around your pillow like this, backstitching at the beginning and end, like a thousand times:
  •  Clip your corners, making sure not to clip into stitching.  Turn inside out, poking out sides and corners, stuff with stuffing, then hand-sew the hole shut.  
Voila!  Ruffle Pillow =)
Pleated pillows tomorrow!

Happy St. Patty's!

Tuesday, March 15, 2011

{Coffee Table Redo}

Somehow in my search through sewing blogs for fun tutorials, I kept coming across furniture redos.  I've always been interested in doing it and did recently refinish my high school bedroom set to be far more attractive.


I did not repaint the original mirror.  I replaced it with one I already had, which was from TJ Maxx for $30!

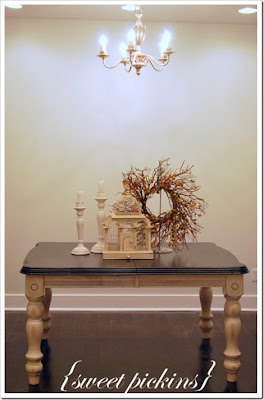
When I found the tutorial for the framed mirror from Show & Tell, I saw that the person who wrote it had another blog called Sweet Pickins, which showcases/sells refinished furniture. 

I. Love. This. Furniture!

I decided to try a few new techniques instead of the whole sand. prime. paint with black. technique.

I showed my husband this table from Sweet Pickins -he loved it- and gave me "permission" to refinish the downstairs coffee table ($30 Craigslist Buy) just like it (in case you didn't know, the basement is apparently his "man cave" that has given birth to some- let's call it heated discussion- about decor).  I'm thankful he's willing to have this piece in his cave!  Here is my inspiration:


I loooooof the contrasting top and legs.  Our coffee table actually looks a lot like this, but on a small scale.  But how do you do this? 

I used this tutorial from, none other than Show & Tell, to figure it out.  Fantastic!  I also consulted with the paint specialists at Home Depot and they helped a ton.

Here is the transformation:


Here is what you need:

Previous owners left us some wood finish, so that's how I got it for free!

  • Furniture with character
  • Primer- water based!  (Do not try to paint a water-based paint onto an oil-based primer.  It will.not.work.  Oil-based paint on a water-based primer is kosher!)
  • Any paint (nothing special- just what you would put on the wall!  Have then mix your favorite color!)  Purchase it in eggshell.
  • Top color paint- I used black oil-based that I had leftover.  In the future, I'd get the Glidden wall paint.  The oil paint didn't seem to appreciate being painted over primer OR being covered by Poly Acrylic!
  • Faux glaze
  • Stain or paint to tint the glaze (I used stain)
  • Polyacrylic Topcoat
  • Paintbrushed (duh!)
Here is what I did:
  • Take table apart and prop top up on saw horses.  We bought these at Home Depot for $25/Set.  Paint with water based primer {the legs were primed and set on the ground}.


  • Paint the sides and legs with the colored paint- again, I used Glidden Eggshell from Home Depot.  My color is called Dessert Khaki.  I was amazed by how smooth this paint went on over the primer.  Paint 2 coats.


  • Have your {handsome} strong husband flip the table over on its back.  I was going to have him put towels on the horses to protect the top of the table, but he ran down to the garage to do this for me before I could blink, so no towels.  It worked out fine!  Tape the table sides so that your "top" paint doesn't run.  I just used leftover painter's tape we had from painting our bedrooms.  Paint the bottom of the top of the table (does that even make sense?) with 2 coats of black paint.  I used the black oil-based paint leftover from the chair redo.  You can paint oil based paint onto water based primer, just not the other way around.

It takes a few coats =)

  • Glazing time!  Mix the glaze with wood stain, 3 parts to 1.  I put it in a stone casserole dish and it washed clean when I was finished.  I thought the glaze looked totally sketch, but it went with it anyway.  Looks odd, but it's right!  


  • Paint it onto the sides/legs- it can be sloppy!- and rub it off after about 1 minute with an old T-Shirt or towel.  Make sure you leave glaze in the cracks and some on the flat areas.  It's what gives it character!  Repeat at least twice.  

Wax On...

Wax off! -click to enlarge!

  • Flip table back on it's front so that you can paint the top of the table.  I put on 3 coats of the black paint.  Once it was dried, coat with 2 thin coats of the Poly Acrylic sealer (smallest can!).  Put it back together and Voila!


Love it!  First glazing experience turned out great.  Excited to do more!  I was a little hesitant to leave on a lot of glaze, so next time I will leave more on with each coat.

Tomorrow?  Shopping.... and couch pillows!


Sunday, March 13, 2011

{Fabric Rosette Tutorial}

Remember my new sink and my dog that is as obsessed with working on my projects as I am?  Well, put them together and we have our first bath in the new sink!


He was SOOO mad at me after this.  He's over it now.  What a cutie!

I love teaching, but let's be honest:  it sucks the life out of you.  That means I can really only work on my "projects" on weekends.  UNLESS it's Spring Break, which is now!

Woooo hoooo!

I hope to be project-filled all week.  A busy bee I will be.  

Anyway, I've been so obsessed with furniture and home furnishings lately that my wardrobe has been neglected.  Hopefully you haven't noticed.  I searched for a project that was A. Cheap, B. Fast, and C. Wardrobe related.  It was so fast I taught my students how to do this and made some at work.  What is it you say?


This project was totally FREEEEEEEEE- I used scrap fabric, already had the glue, and embellished a sweater from The Limited that I have had for years.

Here is the tutorial:

You need:
  • Glue gun with glue sticks
  • Fabric 
  • Felt/fusible fleece (that you won't fuse.  A girl gotta use what she already has!)
Soooooo, what do I do?


1.  Cut a strip of fabric that is 3 in. wide and 45 in. long.  You may or may not use all of the fabric strip- it depends on how long you want the diameter of your flower to be (state assessments are coming up- gotta add in that math vocab word!  Ha)


2.  Tie a knot at one end.


3.  Twist the fabric around itself like a candy cane as you wrap it around the knot like, well, a rosette!  As you twist is around the knot, glue it to the previous "row" as you go along.  You do not want to be able to see the glue!


    5.  Once your flower is the size you want, glue your last row in place, turn your flower over to the back, apply glue, and cover the back with your remaining fabric "flap".  If you have too much fabric, just trim it!
Perfect size!  Fabric flap not yet glued down.
6.  Make as many more as you want- I really like the arrangements of 3 that are slightly different sizes.  Here are mine:
7.  Arrange the flowers that way you want them to be on your shirt/pillow/necklace and glue them to your felt or fleece:

8.  Trim the fleece away so you can't see it anymore:


9.  Hand sew to your attire of choice!


Old Navy was having a sale on some basics, so I embellished a t-shirt, too. 
Shirt:  $5
Fabric:  $1
Total:  $6!


TIP:  Try on clothes before buying and sewing on them.  Turns out this shirt is too big, so I have to return it.  Bummer!  Oh well.

Coffee table redo is JUST about done... should be posted Tuesday at the latest!

Can you make me somethin, too, Momma?  =)