 |
| I did not repaint the original mirror. I replaced it with one I already had, which was from TJ Maxx for $30! |
When I found the tutorial for the framed mirror from Show & Tell, I saw that the person who wrote it had another blog called Sweet Pickins, which showcases/sells refinished furniture.
I. Love. This. Furniture!
I decided to try a few new techniques instead of the whole sand. prime. paint with black. technique.
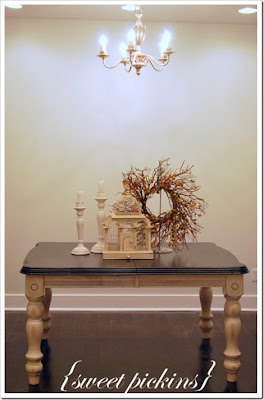
I showed my husband this table from Sweet Pickins -he loved it- and gave me "permission" to refinish the downstairs coffee table ($30 Craigslist Buy) just like it (in case you didn't know, the basement is apparently his "man cave" that has given birth to some- let's call it heated discussion- about decor). I'm thankful he's willing to have this piece in his cave! Here is my inspiration:
I loooooof the contrasting top and legs. Our coffee table actually looks a lot like this, but on a small scale. But how do you do this?
I used this tutorial from, none other than Show & Tell, to figure it out. Fantastic! I also consulted with the paint specialists at Home Depot and they helped a ton.
Here is the transformation:
Here is what you need:
 |
| Previous owners left us some wood finish, so that's how I got it for free! |
- Furniture with character
- Primer- water based! (Do not try to paint a water-based paint onto an oil-based primer. It will.not.work. Oil-based paint on a water-based primer is kosher!)
- Any paint (nothing special- just what you would put on the wall! Have then mix your favorite color!) Purchase it in eggshell.
- Top color paint- I used black oil-based that I had leftover. In the future, I'd get the Glidden wall paint. The oil paint didn't seem to appreciate being painted over primer OR being covered by Poly Acrylic!
- Faux glaze
- Stain or paint to tint the glaze (I used stain)
- Polyacrylic Topcoat
- Paintbrushed (duh!)
- Take table apart and prop top up on saw horses. We bought these at Home Depot for $25/Set. Paint with water based primer {the legs were primed and set on the ground}.
- Paint the sides and legs with the colored paint- again, I used Glidden Eggshell from Home Depot. My color is called Dessert Khaki. I was amazed by how smooth this paint went on over the primer. Paint 2 coats.
- Have your {handsome} strong husband flip the table over on its back. I was going to have him put towels on the horses to protect the top of the table, but he ran down to the garage to do this for me before I could blink, so no towels. It worked out fine! Tape the table sides so that your "top" paint doesn't run. I just used leftover painter's tape we had from painting our bedrooms. Paint the bottom of the top of the table (does that even make sense?) with 2 coats of black paint. I used the black oil-based paint leftover from the chair redo. You can paint oil based paint onto water based primer, just not the other way around.


I love it! And I like your new blog title too. You are definitely gonna have to help me with my place someday.... lol
ReplyDeleteKatie! I LOVE YOUR BLOG! I knew you were super creative, but those turned out FABULOUS! I have a rocker I want to do something fun with, but have been hesitant. I totally feel empowered to do it now! Hope you are well!
ReplyDeletedo you have a tutorial for the bedroom furniture?
ReplyDelete