Sunday, August 14, 2011

Nursing Cover {Tutorial}

First off, we got a face lift.  What do ya think?  I love it- so happy!  I needed a change, bad.

I obviously can't speak from experience, but I am completely enamored by breastfeeding (except for the fact that I was breastfed, but not like I remember that).
That sounds kind of weird-Ha!  Explain:
I think what strikes me as so awesome is that God created this amazing process of procreation and took care of/made provisions for any minute detail that a mother would have to worry about, including feeding.  It reminds me of Matthew 6:25-34 where Jesus is preaching his Sermon on the Mount and talking about the Father's provision of all of our needs when we seek His kingdom and righteousness.  I know He's talking more about survival needs, emotional needs, etc., but still- it makes me think of His great design and I am in awe of it!  How little we deserve to even have food on our plates, clothes on our back, or a perfecting and gracious salvation.  Sometimes I worry in the mornings when we leave for work- or my family is miles away- that something horrible will happen and someone won't make it through the day.  I can rest in knowing that if God cares for the birds and flowers (and the weeds =D), He can fully care for us.  And, well, if something happens, His ways are better than mine (can someone read me this when a bad day does come and I'm lost?!  Yes?  Okay, thanks =D)
Anyshways, breastfeeding.  So cool.  I can't wait to experience that type of bonding with my baby when we have one.  Here is a very very easy tutorial for a Breastfeeding Cover/Nursing Apron/Hootie Hider that costs way less than those in the store and are, in my opinion, way cuter!


You will need:
2/3 yard main fabric
1/3 accent fabric
2 inches “piping” fabric (the little strip in between)
6" of Minkie or towel/terry cloth (optional)
15” of plastic boning
1 D-Ring set
Thread, machine, etc.

We are going to make the main part of the cover first.  I will explain how long and wide to cut your strap fabric when we actually get there.

  • Cut your main fabric to be 35” by 20”.  Cut your accent fabric 35” by 7”.  Keep your piping fabric 2 inches, but trim it down to 35” in length.  Your fabrics will be different in width, but the same in length:

  • Take your piping fabric and fold it in half “hot dog style” (sorry, middle school lingo) so that it is 35” long but now 1” wide.  Iron crease.  This is how wide your piping will be, less the seam allowance.  If you want it skinnier, trim it down (I cut it in half).  If you trim, make sure to keep the folded half. 

  • Alright, place the raw edge of the piping strip along the bottom of the main fabric, matching raw edges.  Pin in place (mine looks like the "top", but I just turned it upside down):
  •  Take your bottom strip of fabric and place it upside down (right sides together with main fabric) and pin down so that raw edges are even.  Serge across (if you are not serging, you will have a raw, unfinished seam on the back of your cover.  I suggest doing a Flat felled seam):

  •  Open out and iron.  If needed, trim your edges so that they are straight and even (yes, I even had to trim.  It happens!)
It should look this way when you open it out.  The piping in the middle of the two fabrics will be a tiny "flap".
Trim it!
  •  Now we will be hemming the sides and bottom of the cover.  Do not hem the top!  We have to insert the straps and boning  First, fold the sides in 1/4 inch, then 1/2 inch.  Iron.  Then fold the bottom and iron.
Fold in the corner (last picture) so that you have a nice, even edge =D)
  •  Optional:  Minkie Hootie Pads for easy mouth/hootie wiping:  Slip a piece of paper into the corner and mark how big you want your pad to be.  If you make them too big, they turn out to be really floppy and easy to snap on things.  If you wiggle the corner of the paper into the corner of the folds you just made, all you need to do is draw the hypotenuse of the triangle and there is your pattern!  Once you cut 2 out, serge or fold under and stitch the hypotenuse side.  The other sides will be sewn into your hems.
Click on me to see detailed pictures!
  •  Place your minkie pads into the corners of the cover and pin in place.
  •  Stitch the hem down, starting in the top right corner and sewing down, back stitching at the beginning and end.  Sew off the cover when you are sewing each side (as in don't pivot- back stitch in each corner and start a new stitch for the bottom and last side).
 Then it looks like...
  • Wowza!  Now, for the top.  Fold the top down 1/4 inch, then an entire inch.  Iron.
  •  I don't have a picture for this, but now measure the entire length of this top edge you just folded.  Say it's around 33.  We have 15" of boning we have to insert, which goes in the very center.  We want to have our straps on the very outside of this boning, so we need to know how far in to place the straps (don't worry, we will make them in a minute!).  Subtract 15 from 33, which is 18.  18 divided by 2 is 9, which means we need to have the straps sewn in 9 inches in from each edge.  Measure in 9 inches from the edge on each side and put a pin in the fabric. 
Don't sew anything yet!  Let's make the straps first.
  •  Straps- cut these from the fabric you bought for the bottom of the cover.  You need to cut 2 pieces:  29" by 6" and 10" by 6".
  •  Complete the following steps for both straps:  Fold them in half hot dog style so that they are still just as long, just half as wide.  Iron.  Open up and fold each side in so that it touches the first fold line.  Iron.  Fold back in half on the original fold line.  Iron.  
Fold in Half.

Open out, fold both sides in to the fold.

Fold in half again.
  •  On the long strap, open it back up and fold in the short side so that once the entire strap is sewn shut, you have a finished edge.  NO need to do this to the short one.
  •  With both strap pieces folded and ironed, stitch on each side and around the edges to finish the edges.
  •  Take your short strap and thread it through 2 D rings (yes, you need 2 of them, or 1 SET).  Sew a seam just below the D ring so that it doesn't slide around.
This package has 2 sets of D rings- there are 4 pieces.  In order for it to work, you need 2 Rings at once!


  •  Placement on the cover:  Remember how we pit pins in the cover 9 inches in from each side?  Place your straps under the folded hem as such, right up to the pin, but not past it.  It's going to look wrong because your straps will be pointing down.  Don't worry- just trust!
Left side

Right side

  •  Sew from the left corner all the way over to the pin, sewing over the strap and sewing it in place.  Sew past the straps, over the center where the boning will be, then stop 1 inch from the right pin.  Sew, then, from the other side the same way to sew the other strap down, but stop at the pin.  Basically, the whole top of the cover will be sewn except for a small hole by one of the straps:

  • Flip both straps upward over the fold so that they are facing up and stitch in place like such:

Stitch in place in a "square" pattern.  Do this to both straps.
  •  Insert boning into the casing you just made through the hole you left when sewing the straps in/hemming the top.  It should just fit and be snug.
  •  Once the boning is in place, stitch the hole closed.
  •  Attach your zipper foot and sew all the way around the boning so it is snug and wants to curve outward.
 and.....
 Finito!
Wayyyy cheap.  I added some flowers to make it ultra cute.  Loooove it!

Saturday, August 13, 2011

The New Budget


There are always going to be those people who want everything.  Those people.  Never content with what they have.  Always wanting more... better... never enough.  They get what they think they want, but then they come to find out that in just a few months, they want the next best thing.  It's like losing weight- if you're disciplined enough to get to the "target" weight you want, most of the time once you're there it's still not enough.  Then, you gain weight and would give anything to be back to that "not low enough" number.  Ugh.  Those people.

I am that person.

and I hate it.

Maybe it's the {what I think is a} need to "fit in" and keep up with trends.  Maybe it's the way I cringe at thinking of what it used to be like when we were first married, in college, and po.  Maybe it's the way I feel when we come home from work, dog tired, thinking, "We work so hard- we deserve to buy {insert item that costs money here}".  Whatever it is, I wish it would just go away.
But, it won't, ever.  I think it has gotten especially bad since Daniel and I joined the Big Kid's Club of careers post-college degree and have expendable income that we had never before experienced as a couple.  Do not read this wrong- I am not bragging about our income or even saying we are rollin' in the dough.  All I'm saying is that our income is {supposed to be} more than our expenses, which didn't start until last year.  A blessing, only from the Lord's hands we know, but it has brought on some definite responsibility and hardships of learning how to be godly with our money.

Godly.  With your money.  Creeeeeeeeeepppy.

No, not at all.  What we have is not based on the success of our own doing whatsoever, but the Lord's provision and the gifts he's developed in us to use in our workplaces.  Everything we have stems down to the blessings we receive through Him.  When I say "blessings", I don't just mean the good things, the things that make us happy like family and friends, worldly things like financial stability, the house and cars.  While those are definite blessings, we consider even the struggles blessings.  We know and hold fast to the relationship we have with him and are thankful he teaches us just like a Dad teaches his children.  By going through struggles, I know the Lord is actively parenting us because he loves us, and that. feels. amazing.

And, well, we're in a "teaching" time of our lives.

Daniel is a pro at so many things- but numbers are a definite forte of his.  He has all of these spreadsheets that I don't want to try to understand that detail out our budget.  Last week, I wrote about how we are planning prayerfully and financially for a baby (that is neither conceived or trying to be conceived) and our budget is a big factor in this.  We realized if we didn't change something, it would be a long time before we could afford a child (or two or three).

We don't think we have to be at a "magical" number financially to start a family.  We know that if it is God's will for us to have a child, he will provide for our needs {read:  NEEDS, not necessarily all desires}; however, we believe that living off of one income and me taking on the role of a stay-at-home momma is the best situation for our family.  In order to do that, we have to prepare- and eliminate some debt.

The D-word.

I get it, debt is debt.  Something inside, though, makes me think differently of car or student loans and credit debt that exists because we bought things we didn't have money for.  We are not in credit debt whatsoever- just the usual- student and car loans.  School is school, so I don't care about those.  We might be paying until we are 50, but we will survive.  We have car payments and that's stressful with a baby on the way {which their isn't} and one income potentially disappearing {which isn't this year}.

SO, Daniel worked up some spreadsheets to get us more financially on track and is leading us to be more godly in our spending.  While we already had a budget in place, we weren't fully aware of what we were spending because we didn't communicate about our spending.  The new plan just makes us more aware and careful.  With our new plan, we will be able to pay off both cars by this time next year and will only be paying student loans in terms of debt.  Yahoo!  Here are some things we did to our budget to make this happen:
  • Cut Entertainment spending by half.  We had a pretty ridiculous amount in their anyway but were somehow still going over budget time and time again.  We still plan enough each week to have one outing.  If we want dinner and a movie, it's going to have to be with a coupon or fast-food and no popcorn.  Big deal.  It's like laying under a slurpie machine full of butter with your mouth wide open anyway.  
  • Create a "Debt Elimination" category in our budget that is just as important as all the other categories:  mortgage, insurances (house, car, health, life), gas for the cars, utilities, groceries, entertainment, gifts, clothing, housing needs (cleaning, etc), pet items, savings (fixed amount goes in every month, but we also doubled this number in the new plan), and retirement.  With our Debt Elimination category, we put specific money away each month and use it to pay more that what we need on payments- in our case, our cars (they have the highest interest rates compared to student loans).  I think we are paying double right now and hope to increase that early next year.
  • Keep a notebook in the car to write down all spending and what category it falls in to.  This way we know what we've spent at the end of the week without having to go through 500 receipts.
  • Keep to the budget.  If we've spent our entertainment budget, we will just have to stay home.  If we are out of gift money, we will have to have cheaper groceries the next week.  It's kind of like the money-in-envelopes theory, but on paper because I hate cash and Daniel thinks I will lose it... which I will.  No money in the envelope means... no money.
  • Over-budget for things while still being reasonable.  Daniel over-budgets for our utilities, groceries, and gas so that if an unexpected gift arises, we have a little cushion.  We've always done this and I almost never spend up to budget and it works out great for us
What does this mean for me?
  • Less home projects.  Booo!  Here's the deal-teaching leaves me zeroooo motivation to do anything- even blogging (which I why I haven't since Monday).  Why?  This Thursday, for example- 14 hour work day.  7a-9p, thanks to Parent night (not complaining- I love meeting parents, but it's a long day).  I don't want to think of it as less projects, just cheaper ones =)
  • Less thrifting.  I think I am addicted to the high of getting something for nothing.  Really.  Every trip to a thrift store is a scavenger hunt.  What can I find and how cheap will it be?  How ugly is this dress and how can I make it into something fabulous?  No more stops, baby. 
  • More cooking, less eating out.  I don't mind this one, I just have to be more organized.
I don't think we did a whole lot to our budget, we just cut some here, double some here, and are becoming more aware and intentional with our spending- basically being more responsible with the gifts God is giving us.  It's been awesome to see how the Lord is changing the attitude I find in the first paragraph in myself.  I feel like he's definitely teaching me that sometimes not having things is a blessing, that I have abundantly more than I need, and I can spend my time more wisely instead of constantly "doing" something required cash flow.

What do you do to save money?  Is it worth it?

    Monday, August 8, 2011

    Tissue Paper Pom Pom {Tutorial}

    I saw these pictures of "thrifty" baby nursery decor and fell. in. love.

    How much do they cost and where do I get these?!?!!?
    Well, Martha Stewart sells kits at Michael's and Toys 'R Us for:

    I don't think so (Martha, I adore you, but you are rich and I am not.  My first teaching job paid me in gum.  Okay, not really, but close).  

    Let's make them!

    You need:
    Tissue paper (6-8 pieces per Pom)
    Craft wire or Pipe Cleaners
    String/Ribbon to hang
    Scissors!
    • First, lay all of your tissue paper pieces out on the table, layered on top of one another.

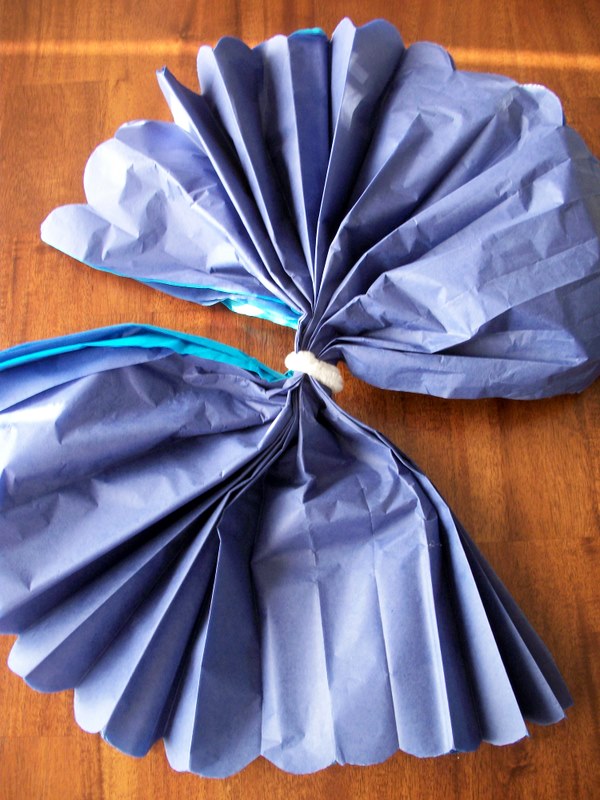
    • Accordion fold the whole length of the paper, starting at one end.  Your folds should be about 1.5inches wide.
    I had a pretty handsome helper who proceeded to act like a fan dancer.  Sheesh.  This man makes me laugh!

    • When your paper is folded completely, trim the ends to be either rounded or pointed.  Either is very cute!

    • Twist your wire or pipe cleaner around the center point.  I cut my pipe cleaners in half because I AM CHEAP, so you need about 6inches of whatever you use.

    • Fan out each side to make the best "circle" you can.

    • Carefully, carefully, carefully, start separating each layer.  I did one of the left side, then one of the right side, then back to the left.  It makes life easier to do it this way.

    • Once you have puffed half of your layers, hold the pom in one hand, grasping the mid point.  Turn it over, and fluff the opposite side the same way so that you have a sphere.
     Annd...
     Please excuse the colors of our Pom.  Daniel wanted to make a "Man Pom"
    Boys. will. be. boys. =)
      Woop woop!  So pretty, soooo cheap.  Mine are going in my classroom!  I will post pictures when they are all up.  LOVE it!
      When we start expecting one day (and if it is a girl), I will definitely be putting these into a mobile above the crib.

      Today was the first day back to school.  Something in me died a little knowing I didn't have any "me" time anymore, but part of me had butterflies at the thought of going back to school.  Maybe it's the smell of pencils and tape, the sound of  18 sewing machines drumming to the beat of Celine Dion, or all the fun things I can do (By the way- found a way to incorporate friendship bracelets into a lesson because A:  it is a textile and B:  we will be practicing math skills with it.  Don't judge- my classes are awesome).  Either way, God's put Romans 6:11-14 (we're studying it in Sunday School) on my heart:
      11 In the same way, count yourselves dead to sin but alive to God in Christ Jesus. 12 Therefore do not let sin reign in your mortal body so that you obey its evil desires. 13 Do not offer any part of yourself to sin as an instrument of wickedness, but rather offer yourselves to God as those who have been brought from death to life; and offer every part of yourself to him as an instrument of righteousness. 14 For sin shall no longer be your master, because you are not under the law, but under grace. 

      Of course, I am human and I sin.  I wish I didn't and I try not to, but I do and I will and it won't stop until I die.  I don't want to and try my hardest to stay clear of it because of the new life I have in Christ!  With the Lord's help and the pursuit of Him, slowly I am transformed into the likeness of Him, perfected on the day I stand in his presence.  Anything short of perfecting right now is forgiven, only through the blood of the cross.  This verse reminds me not to sin in my selfishness of wanting to be home, extending summer and not having to go to work.  Instead, I should be thankful for God's provision for my family that allowed me not to have to work this summer and for the awesome job, school, and students he has blessed me with.  My outlook should be that I am an "instrument of righteousness", ready and willing to do what He wants me to do to serve those at school.  What a great calling (and so hard to do sometimes for selfish reasons)!
      I am so blessed to work in my school and am thankful that, although many may not realize it, God reigns over it. He is the reason for my joy!

       
      designed with love by beautiful dawn designs