Sunday, September 25, 2011

Easy Apron Tutorial Link

My 6th graders only spend 3 weeks (if that!) sewing.  We have to learn how to thread our machines, practice stitching (through paper... it's a pretty awesome way to learn how to control the machine!), and then actually sew something.  Three weeks isn't exactly a lot of time to teach 11-year-olds a skill like sewing and produce something.  One of the other FACS teachers in our district came up with the idea of making aprons and then wearing them during the cooking unit, which is the next and final unit (genius!).  I needed a really easy tutorial, so I found this one.

My students and I made them with paper first, taping down the "seams" (not to scale!  We used 8.5" x 11" paper, so they were mini aprons made of paper).  It really helped because I could reference it later when they were sewing, like "remember how we folded the paper twice and then "stitched" it?  You need to do that, but iron and use your sewing machine" and they could visualize it before sewing.

They did an awesome job.  I was shocked at how quickly they were able to pick it up.  We also measured and cut out pattern pieces to cut our fabric from, so we practiced some good 'ole math skills.  It calls for two tea towels, but I just had my students buy fabric (she gives the dimensions in case you want to do that same!).  You need 25 inches for the main part of the apron and 20 inches for the straps.  Here is mine:
I look like a midget chipmunk here.  Whatever.

It has 2 pockets in front.  Apparently that is very important to 6th graders!  It looks crooked here, but I assure you it is not!  I untied my straps so you could see the pockets and didn't think to tie them in the back.  Woops!

Love it!  What I love even more?  Getting a new apron due to the need to demonstrate how to sew this.  =)

Head over to Polkanuts for the full tutorial (Hey, all you pregnant people!  She has some pretty awesome ideas about sewing maternity clothes if you are interested!).

Saturday, September 24, 2011

Pure


I absolutely love Kari Jobe.  Daniel and I were at a wedding for a couple we were friends with in college, and they had some family members sing "My Beloved".  Gorgeous.  I had to find out who it was by and, there I was, listening to Kari Jobe. love her.  Daniel bought me her CD (well, the most recent one) for my birthday a few years ago and I think I know the whole thing, by heart, from start to finish.
I was out thrifting on Tuesday (Daniel has night classes, so I take my time getting home from school and make a few weekly stops =D) and was listening to a local Christian radio station- and Kari was on it!  She sang some songs from her new album and mentioned her new tour dates.  Holla!  She comes to Missouri/Kansas in December and my sweet husband might be taking me (unbeknownst to him!).  Both nights are titled "Christian Night of Worship"- please and thank you! (by the way, the first day of fall means Christmas music season has begun in our house.  Consider this a warning!).
Anyway, my all time favorite song is Pure by Kari Jobe.  I thought I'd share the lyrics and the video so you can listen.  During times of just pure rottenness in the past few years, this song has helped me focus on the love, grace, and assurance I have in my relationship with Christ.  When I first accepted Christ, I was naturally drawn to topcis and verses of the Bible that focused on how much God loved me, how much he delighted in me, and how his mercies towards me were new every single morning (either typical of new Christians or coming from a girl with a serious low self esteem and all of the self-loathing behaviors that come with it-which the Lord healed!).  While those things are all definitely true and awesome, I feel like God slowly started teaching me that while, yes, He loves me and nothing can separate me from his love and promise, it's not about me.  My heart kind of transformed over time to absolutely adore learning about his majesty, his holiness, and who He is, not what He can do for me.  Even if He didn't love me as much as He does or watch over us like He does, He would still be worthy of 100% of my love, worship, and obedience.  Learning about God's holiness and the majesty of a Savior makes me think, the God who created the universe with just a word, who cares and watches over billions of people all at the same time, who can do all things, who can send his perfect Son to save- HE made a way for us to spend eternity with Him all on his own, requiring nothing more than that we believe and follow?  Who does that?  My God, that's who!

Here are a few verses that I've been praying through lately.  How blessed we are that God left His Word for us!

Psalm 8:3-5
When I consider your heavens,
   the work of your fingers,
the moon and the stars,
   which you have set in place,
What is mankind that you are mindful of them,
   human beings that you care for them?

You have made them a little lower than the angels
   and crowned them with glory and honor. 


 Isaiah 6:1-3
 In the year that King Uzziah died, I saw the Lord, high and exalted, seated on a throne; and the train of his robe filled the temple. Above him were seraphim, each with six wings: With two wings they covered their faces, with two they covered their feet, and with two they were flying. And they were calling to one another:
   “Holy, holy, holy is the LORD Almighty;
   the whole earth is full of his glory.” 


I don't mean to sound morbid, but I cannot wait for the day when I am there and can see this- to worship the Lord of all with people I love.  There is no greater joy!


Anyway, here is Pure by Kari Jobe.  Listening to it just makes my heart warm!
I hope it blesses you as much as it does me!

Your love is pure
Your love is precious
Your love is all I need
Your love surrounds me
Your love astounds me
Your love is everything.

I run to you
My heart is weak
I cling to you
You're all I see
It's my hearts desire
To be close to you
Here in your arms
I'll find my strength.

Your love is pure
Your love is precious
Your love is all i need
Your love surrounds me
Your love astounds me
Your love is everything.

I run to you
My heart is weak
I cling to you
You're all I see
It's my hearts desire
To be close to you
Here in your arms
I'll find my strength.

Monday, September 19, 2011

Stenciled Lamp Shade

Welp, the wainscoting is Fiiiiiinished!  Guuuuuush.  I love it!  Here is the before and after:


You know what I love the most?  You can wash the wall.  Who ever heard of that?!  I love it!  No more scrapes I have to worry about or little sticky fingers (in the future of course!  Although I did have a dream last night that I gave birth to a chicken cutlet.  Literally.  What. the. heck.)  I love love love the contrast of the white with the taupe wall.  My husband is awesome.  I love him so much- I mean, really.  Marriage and the deep, precious connection you can have with someone is truly a blessing.  I go to bed so many nights (we do have off days, people!) thinking, "I can never get enough of this man".  Trying to show him that is a different story, but I'm workin on it.  One thing I love and respect in my husband is his mind.  This man is smart!  He did so much math that I forgot how to do since high school and it was no big dill to him.  =)  Gotta love this face!
Yummy!  Haha.  No, but really.

Anyways, did not realize this, but lamp shades cost cash money.  I wanted one for our basement that had a print on it, but I couldn't find one for less than $25.  Even then, it wasn't what I wanted.  I wanted a drum lamp shade (which tend to be more expensive for some reason) with a bold graphic print, taupe and white, with navy blue- oh, and did I mention cheap?  Tall order, sis.  Welp, guess I'll make it!
I bought this shade at Target on clearance for $10 (it was originally $19.99!).  I changed one of my prescription medications, and I had a coupon for a $10 gift card with a new/transferred script (which is free with insurance.  BAM).  SO, free lamp shade.  I borrowed the paint/tiny paint brush from a gal pal, had the adhesive, and paid $1.44 for the bias tape.  SO, this is a $1.44 makeover!
Here is the before and after:

"My goodness, woman!  How did you do that?" sayeth my charming husband.  Here's how!

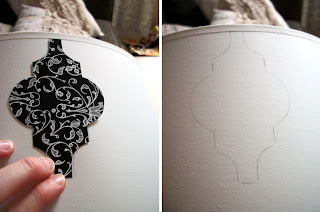
At first, I thought I would do freezer paper stencils.  Hello- these things are genius.  So, I found my design, cut it out, traced it, cut it out again 5000 times with freezer paper, and ironed 2 stencils on.

Then, disaster.  Warped lamp shade!
Fail.  Yes, it does happen to me, a lot actually!
 Noooooooooooooooooooooooooooooo!  I guess the heat from the iron melted the inside of the lamp shade.  Boo.  So, I had to, by hand, trace the stencil on the shade with pencil and spend four hours carefully painting inside the lines.  Totally, 100%, no doubt about it worth it.

I used just regular old craft paint in Greige.  Yum.


I actually really liked it without the trim, but I wasn't so careful around the edges of the lamp because I knew I was going to cover it.  When I do this again, I will tape off the edges!  I used this magical product (which I already had and paid nothing for because Joann's was having a BOGO sale on the ironing notions wall.  Holla!) to stick the bias tape on the edges. 
It's press on!  Does not even require an iron.  Love.


I thought about making my own strip of fabric instead of purchasing bias tape, but I knew it would not be perfectly straight and well- do you know me?  That's not okay!  It was only $1.44.  I didn't have any navy fabric anyway!
See that little flower holder?  Gorg, ceramic, and $1 at Salvation Army.
Ah, glorious.  Who knew a lamp could make a girl so happy?!  I scored a whole tub of picture frames from Daniel's Aunt and Uncle (thanks!!), so I'm going to do something like this over the couch:

 Looooove.  Oh, to be a stay at home wife and craft all day!


Saturday, September 17, 2011

Cake Mix Cookies

Did you know you can make cookies from a box of cake mix?  They are fast, cheap, yummmmmmmy, and require very few ingredients.  I make these when I need to treat my students to a little something {mostly to gain popularity}.
{I'm mostly kidding}.
I also make them for the kiddies at church, which is where this batch is going!  Daniel and I are coaching bible quiz- both hilarious and fun (Did you know God sent 10 legs to Egypt to convince Pharaoh to set His people free?  =)  The things you learn!).  We love it!
Anyway, here we go!

Ingredients:
1 box cake mix (my favorite is the chocolatiest one I can find!)
2 Eggs
1/2 Cup Oil
Add-ins (chocolate chips {our fav}, nuts, marshmallows {this recipe}... anything!)

Directions:
Mix all together.  Scoop onto baking sheet.  Bake at 350 for 9 minutes.  Done!
So. Good.
Here is where the wainscoting is today- almost there! 
The last few days we have painted the trim "boxes".  Now, we just need to Caulk them.  Sweeeet!
Come back for that tutorial (okay, it's going to take me a while to write that beast!) and a painted lampshade.  The lampshade is worth the wait!  I will post it tomorrow =)  Happy Saturday night (this is, by the way, my all time favorite time of the week!)


Tuesday, September 13, 2011

How to Hand Wash Clothing

First, can I say I loooooooove the powdered detergent I made?  Seriously, it's the only thing I use with my whites (all of our towels are white, so that's a lot!) and I'm already out.  Good thing it's fun {and cheap} to make! 

Sad, but true.
I have so many things that require handwashing and I never have the time to do it... so they stay at the bottom of the laundry pile for months. on. end.  (Seriously, I found a Banana Republic sweater that had been down there since last school year.  REALLY?  I am ashamed!)  So neglected, so... stinky (mostly from the clothes being heaped on top... and mostly from my husband.  What is it with men and stink?  Men are so weird.  Haha.  Love mine, though!  Oh man.  There is not a day that goes by that I am not thankful I am a woman!).  I only hand wash items that have appliques on them (beads, flowers, etc) and things I sew for myself.  I know they would be okay in the washing machine, but I just couldn't bear to see one of my babies ruined.

I finally hand washed 6 garments on Sunday and thought- wow, I might as well get a blog post out of this! SO, here is how you handwash your clothing.

  1. Spot-treat stains just as you do with clothes you put in the washer/dryer.  I didn't have any stains, so I skipped this step.
  2. Fill up your sink or tub (any space big enough for soaking and simulating agitation) with cold water and detergent.

  1. Put clothes in the soapy water.  I had 2 loads and washed with like colors like I would typically do.  This load was for bright colors, the other was for whites.
  2. Let the clothes soak.  I usually go do something else, forget, and then come back hours later.  It's never caused a problem!

  1. Mimic an agitation cycle.  Spin the clothes around with your hand, squeeze the clothes gently to help the water and soap permeate the clothing, and pay special attention to collars and arm pits.
Picture 3.  Hump back.  Check it out.

  1. Drain soapy water.

  1. Run clothing under cold water to rinse until the water is no longer soapy or bubbly.  Make sure to get all of the detergent out!  If you leave some in your clothes, it can damage the fibers.

  1. Drying time!  Gently squeeze as much water out of the item as possible, but try not to twist it-just squeeze gently. Then using a heavy absorbent dry towel, lay the clothing flat and roll it up in the towel, as such:

Step on it!  Check out the nasty-ness of this situation:  My curling iron is still out, I'm in sweatpants I've worn every evening for 3 days straight (that I stole from my sister!), and our bed has no sheets and there are clothes everywhere.  This would be my every-Sunday, cleaning everything!

  1. Dry enough to hang!  If something has beads or heavy embellishments, I dry it flat.  Otherwise, I hang dry.
Done!  My dog has an infatuation with 1.  Dirty clothes (my mom told me to take dirty socks with us when we picked him up and put them in his bed so he would learn our scents and be comforted by them.  All he does now is steal our dirty clothes and lay in them.  FREAK.) and 2. Tubs.  It's rather odd.  He screamed at me the whole time I did this.

Anyway, TAKE CARE OF YOUR CLOTHES!

We are finishing the wainscoting (yessss!), so here is what our hall is up to now.  Needing paint and caulk!
My husband is pure. stud.

Got some sweet basement makeover updates comin' at ya soon!


Sunday, September 11, 2011

Oatmeal of Olay

So, we have clubs every Friday afternoon to build relationships with our students while doing "fun" things.  Last year, we did Craft club ( by "we" I mean me and Cheryl, the other FACS teacher in our Dept.) and it totally stunk.  We did projects a project that took literally all year and not a single kiddo finished.  It was horrible.  We only saw students once a month, so we had to reteach the skill every. single. month.  A lot of teachers worked really hard to arrange the clubs, so I don't want you to think I'm complaining.  I couldn't have done any better.  The system sounded great, but with all of our snow days, testing, etc... it just didn't work.  We also just chose a bad project for the club.  We should have done projects that were started and finished each session, but we goofed.  Oh well!  Sometimes it's really hard to anticipate how long it will take middle schoolers to pick something up.
I'll clue you in right now:
They cannot cross stitch, do plastic canvas, or successfully needle punch.
Boo.

This year, we decided to do something that didn't "require a lot of prep".  Shhhhya, right.  Everything requires planning!  How silly of me to think other wise!
Nonetheless, Spa club looks like it's going to be 10 bijilion times better than Crafts.  I ordered every girl (yes, we only have girls and we listen to Enya all hour.  Hahah!) a hair feather from Pick Your Plum on Thursday for only $1 each.  They are all wearing them and pay $10 each at the salon to have them put in (most of them have 3 in their hair at once!).  I am so excited!  We. are. so. cool!

This week, we "made" soap and it was a lot of fun. I bought cheap soap for school (budget, people!), but for my own session at home, I bought Olay (ideal would be Dove, but I didn't want to pay $3.50 for 2 bars.  I am cheap, I tell you!  This was $1 at the Dollar Store!).  I don't believe they make an oatmeal soap-I could be wrong-but this is an awesome way to take your favorite soap and make it into an oatmeal soap.  This is Howie Do it!

 Ingredients:

1 Bar of your Favorite Soap
1/4 Cup oatmeal
1/4 Cup water
First, Grind up 1/4 cup oatmeal in a blender or food processor (I did this at school- no picture!).  Make sure you have whole oats left- not oatmeal flour!
Second, grate your soap (I must be the last FACS teacher on Earth to not that a cheese grater in my kitchen!) or chop it up and then grind in the food processor.  Whatever method you use, get that soap into tiny pieces!


Pour into a bowl and add 1/4 cup water.
Looks like cotta-hey cheese!
Microwave for 2 minutes or until soap is melted and bubbling.

Add in oatmeal

Pour into cute molds (you can get some really cute ones at Michaels, but I just put some in mini muffin tins) or pour onto a baking sheet.

Let cool and remove or use cookie cutters to cut shapes from the baking sheet.
Do not let husband or kids mistake for white chocolate treats!
Awesome!
Benefits of oatmeal soap:
  • Natural Exfoliate
  • Relieves skin itching and irritation
  • Absorbs oil
Benefits to Eating Oatmeal:
  • Keeps you full.  Long time.
  • Lots of fiber!!
  • Stabilizes blood sugar and reduces risk of diabetes
  • Removes your bad cholesterol- back to the whole fiber issue.  Think of fiber as a big broom that sweeps out the cholesterol in your arteries.  No joke.
  • Antioxidants
  • Boosts immune system

    Lots of others... which is why I fed my husband this this morning:
    Whole Wheat Oatmeal Cinnamon Waffles!
    Seriously, this kept me full through all of church- which hardly ever happens!

    Ingredients

    • 1 1/2 cups all-purpose flour
    • 1 cup quick-cooking rolled oats
    • 1 tablespoon baking powder
    • 1/2 teaspoon cinnamon
    • 1/4 teaspoon salt
    • 2 eggs, slightly beaten
    • 1 1/2 cups milk
    • 2 tablespoons butter, melted
    • 2 tablespoons brown sugar

     Mix together all dry ingredients.  In separate bowl, beat eggs and milk, add butter.  Make a well in the middle of the dry ingredients.  Pour in liquid, slowly mix together.  It will look like this:
    Put in waffle iron and yum!  Done.  So good!  Top with peanut butter for added protein or syrup.

    I am notoriously awful at making Chinese food, but I made sesame chicken last night and it was bomb.  I will post later this week!

Keeping It Simple

Friday, September 9, 2011

Trashie Trough

I know, I am horrible- my last post was last Friday.  This whole "work" this just cramps my style!
Kidding.
I am so thankful that God provided me with a job that 1. Pays bills and 2. I enjoy... really enjoy.  Then, just to make things better, he gave me opportunities to form relationships with awesome people.  Love it!  It does control my life, but hey, girl's gotta do with a girl's gotta do.
Plus, we can work extra duty (i.e. take money at the gate and do scoreboard at volleyball games.  Easiest cash I ever made!) for extra-spending.  Me likey.


A few weeks ago, I hounded the free section of Craigslist for a wood pallet.  Yuuuuuuuuup.  Found it! (that was a Storage Wars yuuuuup by the way.  Dedicated to my husband). It was in a neighborhood whose residents could probably afford 2 of my house, so it was really embarrassing picking the pallet from the curb.  But, if you know me in real life (not just blog world!), you know I. have. no. shame.  So I loaded that puppy up and brought it home!
Some of it was pretty nasty and in rough shape.  My original plan was for Daniel to pull some of the 2*4's (or whatever they are) off and make me a trough-shaped flower container thing.  He inspected it and, after trying to pull parts of it off, it started to split.  SO i figured out- HEY, the wood is already built in trough-like shape.  We just need to cut one out!
Exhibit A: husband hacking at pallet.  Pretttty sure that whole flip flop thing is a safety hazard.  He likes to live on the edge.

Anyway, we were left with this:
I love the words on the side!  It's not cut perfectly, but I like it that way.  You can't tell when it's on the mantle anyway!
The people who lived in our house before us left us a ton of paint/stain, so I found this:

and already had this to seal it:
I wanted to stand it down a little, so I gave it a good rub with this:
I painted one coat of stain on the inside and outside, let it dry overnight, then put a coat of Polycrylic down:

This is my favvvvvorite part! I love the little imperfections and knots!
And....  Boooooya!

I had to buy the flowers at Hobby Lobby, but they were 50% off and I had several Etsy orders this month to balance it out.  Love love love!

Cheryl and I are hosting the Spa Club this year at school, so I have this week's project to share tomorrow.  We are also finally finishing our wainscoting project tomorrow.  I am so thankful (and in love!) with my talented husband!


Keeping It Simple
designed with love by beautiful dawn designs