Showing posts with label DIY Decor. Show all posts

Saturday, November 12, 2011

Monogrammed Twine Letter

I was telling my girls at FCA this week (which has grown to about 31 kiddos.  Awesome!) about the Women of Faith conference and how much I loved seeing Amy Grant.

One of the girls I have in class said, "Oh, I know her".
Shut. Up.

I guess she met her on a cruise a few years ago and her family is good friends with Michael W Smith.  She ate dinner with her and snorkeled with her, too.  She said she gets backstage passes to her shows when she is close.  I can't believe I know this girl!  I loved her before this, but now I really like her (kidding.  But she is a great girl!).  And I'm not talking the Make-A-Wish type of "I know her".  She knows her.  Crazy!

Here is a video from the conference last week.  My mom, sis and I love Baby, Baby.

Anyway, I thought that was worth sharing.  =)
Here are some things I've been doing-

I made some new kitchen curtains to replace the ones our previous owners left (yes, it only took me 11 months to replace them!):
Before:
Seller Photo.
After:

Don't you just love pleats?  This style would be darling on the crib skirt of a baby crib.  Love it!  Cost:  $6!

I jumped on the twine-wrapped-monogram-letter trend and made this:

Here is how you do it:

Make sure you hot glue the twine down as you go!


I love layering mantles.  It adds so much depth!  This craft cost only $1!  Letter- half off of $2 at Hob Lob, had the twine and glue.

We now have a serious problem in our house right now.
WHERE DO WE PUT THE CHRISTMAS TREE?
This is our first Christmas in our house and the first time setting up our tree (which is also "new".  Scored an 8-footer at a church rummage sale for $10!!).  What do you think?
Yes, I am watching an ultra-trashy Teen Mom at 7:30 am on a Saturday.

Leaning more towards the second one.  We are decorating next Friday-I will let you know what we decided! =)

Friday, September 9, 2011

Trashie Trough

I know, I am horrible- my last post was last Friday.  This whole "work" this just cramps my style!
Kidding.
I am so thankful that God provided me with a job that 1. Pays bills and 2. I enjoy... really enjoy.  Then, just to make things better, he gave me opportunities to form relationships with awesome people.  Love it!  It does control my life, but hey, girl's gotta do with a girl's gotta do.
Plus, we can work extra duty (i.e. take money at the gate and do scoreboard at volleyball games.  Easiest cash I ever made!) for extra-spending.  Me likey.


A few weeks ago, I hounded the free section of Craigslist for a wood pallet.  Yuuuuuuuuup.  Found it! (that was a Storage Wars yuuuuup by the way.  Dedicated to my husband). It was in a neighborhood whose residents could probably afford 2 of my house, so it was really embarrassing picking the pallet from the curb.  But, if you know me in real life (not just blog world!), you know I. have. no. shame.  So I loaded that puppy up and brought it home!
Some of it was pretty nasty and in rough shape.  My original plan was for Daniel to pull some of the 2*4's (or whatever they are) off and make me a trough-shaped flower container thing.  He inspected it and, after trying to pull parts of it off, it started to split.  SO i figured out- HEY, the wood is already built in trough-like shape.  We just need to cut one out!
Exhibit A: husband hacking at pallet.  Pretttty sure that whole flip flop thing is a safety hazard.  He likes to live on the edge.

Anyway, we were left with this:
I love the words on the side!  It's not cut perfectly, but I like it that way.  You can't tell when it's on the mantle anyway!
The people who lived in our house before us left us a ton of paint/stain, so I found this:

and already had this to seal it:
I wanted to stand it down a little, so I gave it a good rub with this:
I painted one coat of stain on the inside and outside, let it dry overnight, then put a coat of Polycrylic down:

This is my favvvvvorite part! I love the little imperfections and knots!
And....  Boooooya!

I had to buy the flowers at Hobby Lobby, but they were 50% off and I had several Etsy orders this month to balance it out.  Love love love!

Cheryl and I are hosting the Spa Club this year at school, so I have this week's project to share tomorrow.  We are also finally finishing our wainscoting project tomorrow.  I am so thankful (and in love!) with my talented husband!


Keeping It Simple

Tuesday, August 23, 2011

Homemade Laundry Detergent {Tutorial}

Joke around our department is that this is me in commercial form:


Glitter.  So much Glitter!
This is how excited I was to make this detergent!  I love love love finding fun ways to take care of our home and try new things.  This trick is perfect!  We are making this on Thursday at school to finish our unit on laundry- my students will have to do laundry for their families (3 different loads) and they will get to take home enough detergent to do so!  I've included the label that will go on my students' containers.  Feel free to print it for yourself!

Ingredients:
1 Bar Fels Naptha Laundry Soap
1 Cup Borax
1 Cup Super Washing Soda (aka Soda Ash)
1/4 cup Baking Soda
I was able to find these ingredients super easy at our local grocery store.  I'm sure Walmart would carry them, too!
  • First, grate the bar of soap with a cheese grater.  I used this handy dandy gadget, but it actually wasn't that handy!  A cheese grater would work best.  I would suggest wearing gloves, too.  It's a little harsh to touch that much concentration of soap.
     
  • Once you have the whole bar grated, transfer to a food processor.  Grind into a very fine powder.
  • Pour soap "dust" into a bowl.  Add Borax, baking soda, and washing soda. 


  • Mix together!


    Keep in air-tight container!  2 tablespoons is enough for a normal load.  As with all powder detergents, dissolve in the wash water first before adding clothing.  Little pockets of powder in the folds of your clothing can cause the detergent to eat your clothing.  Dissolve first!  I tend to overload my washing machine, so I put in an extra tablespoon.  It has a nice smell in dry form and when the clothes are wet, but the scent will disappear in the dryer.  I love it!  I've heard this also works in HE washers.  Basically, if you can use a powder, this recipe should be okay.  I would read your owners manual.

    I repurposed an applesauce jar that my Grandma canned this summer!
     Printable Label:

I heard this recipe might be too harsh for baby items, but I also know people who do use it {on everything} and love it. I've also heard Borax might not be the best for bright bright colors, but the box says it's a perfect and natural alternative to colorsafe beach... which should mean it'll be okay, Anyway, I've used it on a load of whites and on some jeans/workout shorts. Everything turned out fine!

Cost:
Fels Naptha Soap:  $.99
Borax:  $3.79
Baking Soda:  $2.69 (although I had this already)
Washing Soda:  $3.19
Total:   $10.66

Keep in mind the only thing I used in its entirety is the bar of soap.  I barely made a dent in the other 3 ingredients.  This is way cheaper in the long run than buying detergent.

If you are into "Green" cleaning solutions, The Naturally Clean Home by Karyn Siegel-Maier is an awesome book with tons of recipes:

I didn't get this detergent recipe from it, but it had it in there.  I'm planning on making the dishwasher detergent this week, too!  This book is big on essential oils that you can add for happy smelling.  Also, apparently vinegar is a fabric softener.  Who knew?  It is non-toxic, removes soap residue and prevents static cling in the dryer.  However, vinegar can make dyes in come fabrics run, as with rayon.  Just say no! =)  I will stick to my Aldi softener, thank you!


Monday, August 8, 2011

Tissue Paper Pom Pom {Tutorial}

I saw these pictures of "thrifty" baby nursery decor and fell. in. love.

How much do they cost and where do I get these?!?!!?
Well, Martha Stewart sells kits at Michael's and Toys 'R Us for:

I don't think so (Martha, I adore you, but you are rich and I am not.  My first teaching job paid me in gum.  Okay, not really, but close).  

Let's make them!

You need:
Tissue paper (6-8 pieces per Pom)
Craft wire or Pipe Cleaners
String/Ribbon to hang
Scissors!
  • First, lay all of your tissue paper pieces out on the table, layered on top of one another.

  • Accordion fold the whole length of the paper, starting at one end.  Your folds should be about 1.5inches wide.
I had a pretty handsome helper who proceeded to act like a fan dancer.  Sheesh.  This man makes me laugh!

  • When your paper is folded completely, trim the ends to be either rounded or pointed.  Either is very cute!

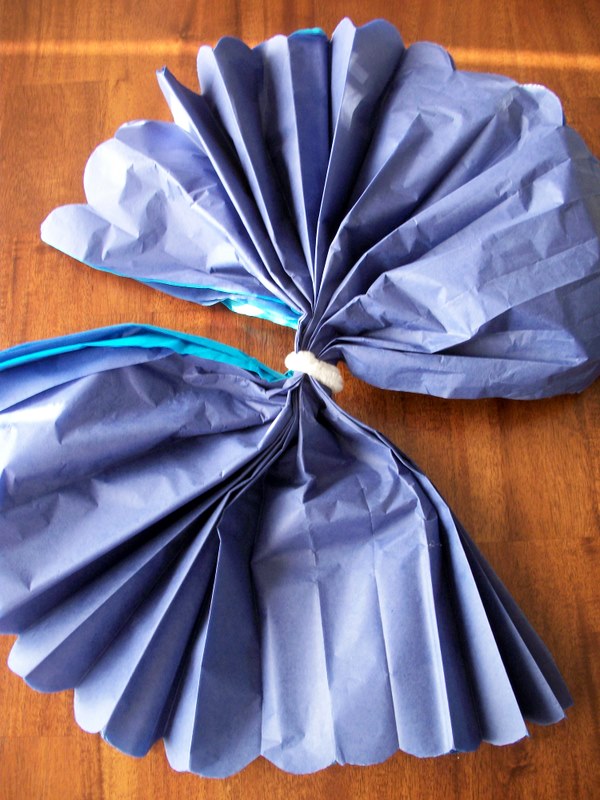
  • Twist your wire or pipe cleaner around the center point.  I cut my pipe cleaners in half because I AM CHEAP, so you need about 6inches of whatever you use.

  • Fan out each side to make the best "circle" you can.

  • Carefully, carefully, carefully, start separating each layer.  I did one of the left side, then one of the right side, then back to the left.  It makes life easier to do it this way.

  • Once you have puffed half of your layers, hold the pom in one hand, grasping the mid point.  Turn it over, and fluff the opposite side the same way so that you have a sphere.
 Annd...
 Please excuse the colors of our Pom.  Daniel wanted to make a "Man Pom"
Boys. will. be. boys. =)
    Woop woop!  So pretty, soooo cheap.  Mine are going in my classroom!  I will post pictures when they are all up.  LOVE it!
    When we start expecting one day (and if it is a girl), I will definitely be putting these into a mobile above the crib.

    Today was the first day back to school.  Something in me died a little knowing I didn't have any "me" time anymore, but part of me had butterflies at the thought of going back to school.  Maybe it's the smell of pencils and tape, the sound of  18 sewing machines drumming to the beat of Celine Dion, or all the fun things I can do (By the way- found a way to incorporate friendship bracelets into a lesson because A:  it is a textile and B:  we will be practicing math skills with it.  Don't judge- my classes are awesome).  Either way, God's put Romans 6:11-14 (we're studying it in Sunday School) on my heart:
    11 In the same way, count yourselves dead to sin but alive to God in Christ Jesus. 12 Therefore do not let sin reign in your mortal body so that you obey its evil desires. 13 Do not offer any part of yourself to sin as an instrument of wickedness, but rather offer yourselves to God as those who have been brought from death to life; and offer every part of yourself to him as an instrument of righteousness. 14 For sin shall no longer be your master, because you are not under the law, but under grace. 

    Of course, I am human and I sin.  I wish I didn't and I try not to, but I do and I will and it won't stop until I die.  I don't want to and try my hardest to stay clear of it because of the new life I have in Christ!  With the Lord's help and the pursuit of Him, slowly I am transformed into the likeness of Him, perfected on the day I stand in his presence.  Anything short of perfecting right now is forgiven, only through the blood of the cross.  This verse reminds me not to sin in my selfishness of wanting to be home, extending summer and not having to go to work.  Instead, I should be thankful for God's provision for my family that allowed me not to have to work this summer and for the awesome job, school, and students he has blessed me with.  My outlook should be that I am an "instrument of righteousness", ready and willing to do what He wants me to do to serve those at school.  What a great calling (and so hard to do sometimes for selfish reasons)!
    I am so blessed to work in my school and am thankful that, although many may not realize it, God reigns over it. He is the reason for my joy!

     
    designed with love by beautiful dawn designs