Showing posts with label Crafts. Show all posts

Friday, October 14, 2011

Fun with Felt


I love felt!
What is felt, anyway?
Most fabric is woven, so it has weft and warp yarns (vertical or horizontal in lamens terms).
Felt is a non-woven fabric, like dryer sheets.  Fibers from wool or synthetics are pressed together using heat, moisture, and pressure.  It's super cheap and can do some pretty fun things.
Here are just a few things I've been making with felt:

Dog Costume
(he hates it.  i love it.)
I found this at Walmart (yes, I whipped out my camera!  I was grocery shopping for school at 7:15 in the morning on a Thursday. It was a ghost town people)

It's supposed to be a caterpillar and I didn't know that until after I was done with his costume.  Oh well, he is a 6 legged Caterpillar.  It was $8, and I made this for $1.  It's a dog.  It will do.
I just realized it's way cuter with the little hood.  I will have to add one!

Bib Necklace
Super cheap jewelry and "Mrs. Gibson, it looks like it was really expensive".  Yep, it was $2.25.

Here are the steps:
Cut this kind of shape from black felt- twice.


Use ribbon or an old chain and glue it in between both layers of felt. 

Buy these rhinestones- one package, different shapes and sizes.  Half off at Joanns for $2.
Place rhinestones on top (not really a rhinestone girl- it's a little gawdy, but I guess one piece is okay!) and, only after you have figured out where you want them, glue in place.


Felt Blooms
Perfect on gifts, cards, or a baby's head!  2 versions:


How?  For the first bloom, cut 7 flower shaped pieces, plus a circle.  Fold in half twice and glue four "foundation" petals down.  Fill in the gaps with the other double-folded petals.

Or cut circles and complete the same steps for this look:

I like the flower-shaped petals more.  So sweet!  I made a brooch by gluing a pin to the back...

and pinned them to this shirt:

LOVVVE!
Who knew?  A $.25 piece of felt can do so many things.  Love it!
Even though I just taught you how to make them, I'm def selling these brooches and baby headbands on my Etsy!  Woot!
Tomorrow I have a post about refilling glade plug ins- come back if you have one!


Sunday, October 2, 2011

Fun with Leather

Yep, a whole week since my last post.  I really hope this doesn't become a trend.  Last week was busy- I had a few volleyball games, a dentist appointment (Yeah, I need a crown and am ticked.  I spit in your face, metal fillings from 10 years ago!), and I was sick.  Fighting both allergies and cold/flu doesn't give you much energy!
Anyway, last Thursday most of the kids in my morning classes were gone on a field trip (it is still beyond me why I don't plan field trips.  This has to change!  There is a textiles plant right outside of town.  Tour?  Yes please!) and I didn't want them all to be behind (we were starting something new), so we had fun with leather!
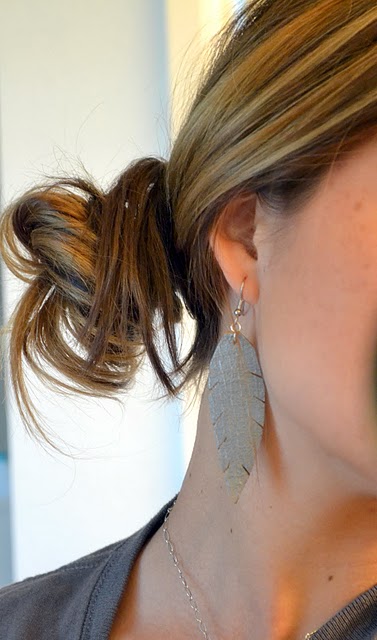
This is what we made:

Leather Feather earrings!  The girls looooooooooooved it and they were all wearing them when I saw them at lunch.  I think I will wear mine this week with some awesome outfit... because... have you not heard?  The 8th grade class voted me "Best Dressed"!  I don't mean to boast, and I'm honestly quite surprised, but I was never voted anything when I was in school- all 13 years of it.  I feel so loved!  What's even more funny is that it happened on the day that I wore (and got several compliments on) the LOVE PINK sweatpants from Victoria Secret that I scored from the lost and found at school 2 days after school was out last year.  Fair game!  People might tease me for looking like a middle schooler (which I actually enjoy and think is hilarious), but at least I fit into their clothes!  Haha.

Here is the tutorial I used from Little Miss Momma.  Seriously, she has some of the coolest stuff to make and her tutorials are awesome.  It is quickly becoming one of my fav blogs to visit!
Little Miss Momma
Little Miss Momma
I will say, I did not use a needle for the hole.  I used a nail and hammer.  It works better.
Little Miss Momma
Little Miss Momma
Little Miss Momma
 I made a pair by layering 2 "feathers" in different colors, too.

 We made this with leather donations from Ellen, one of our Art teachers (They were real leather samples, too), earring donations from Cheryl, our FACS department head, and tool-borrowing from Megan, the other art teacher.   Thanks, Ellen, Cheryl and Megan!

Monday, September 19, 2011

Stenciled Lamp Shade

Welp, the wainscoting is Fiiiiiinished!  Guuuuuush.  I love it!  Here is the before and after:


You know what I love the most?  You can wash the wall.  Who ever heard of that?!  I love it!  No more scrapes I have to worry about or little sticky fingers (in the future of course!  Although I did have a dream last night that I gave birth to a chicken cutlet.  Literally.  What. the. heck.)  I love love love the contrast of the white with the taupe wall.  My husband is awesome.  I love him so much- I mean, really.  Marriage and the deep, precious connection you can have with someone is truly a blessing.  I go to bed so many nights (we do have off days, people!) thinking, "I can never get enough of this man".  Trying to show him that is a different story, but I'm workin on it.  One thing I love and respect in my husband is his mind.  This man is smart!  He did so much math that I forgot how to do since high school and it was no big dill to him.  =)  Gotta love this face!
Yummy!  Haha.  No, but really.

Anyways, did not realize this, but lamp shades cost cash money.  I wanted one for our basement that had a print on it, but I couldn't find one for less than $25.  Even then, it wasn't what I wanted.  I wanted a drum lamp shade (which tend to be more expensive for some reason) with a bold graphic print, taupe and white, with navy blue- oh, and did I mention cheap?  Tall order, sis.  Welp, guess I'll make it!
I bought this shade at Target on clearance for $10 (it was originally $19.99!).  I changed one of my prescription medications, and I had a coupon for a $10 gift card with a new/transferred script (which is free with insurance.  BAM).  SO, free lamp shade.  I borrowed the paint/tiny paint brush from a gal pal, had the adhesive, and paid $1.44 for the bias tape.  SO, this is a $1.44 makeover!
Here is the before and after:

"My goodness, woman!  How did you do that?" sayeth my charming husband.  Here's how!

At first, I thought I would do freezer paper stencils.  Hello- these things are genius.  So, I found my design, cut it out, traced it, cut it out again 5000 times with freezer paper, and ironed 2 stencils on.

Then, disaster.  Warped lamp shade!
Fail.  Yes, it does happen to me, a lot actually!
 Noooooooooooooooooooooooooooooo!  I guess the heat from the iron melted the inside of the lamp shade.  Boo.  So, I had to, by hand, trace the stencil on the shade with pencil and spend four hours carefully painting inside the lines.  Totally, 100%, no doubt about it worth it.

I used just regular old craft paint in Greige.  Yum.


I actually really liked it without the trim, but I wasn't so careful around the edges of the lamp because I knew I was going to cover it.  When I do this again, I will tape off the edges!  I used this magical product (which I already had and paid nothing for because Joann's was having a BOGO sale on the ironing notions wall.  Holla!) to stick the bias tape on the edges. 
It's press on!  Does not even require an iron.  Love.


I thought about making my own strip of fabric instead of purchasing bias tape, but I knew it would not be perfectly straight and well- do you know me?  That's not okay!  It was only $1.44.  I didn't have any navy fabric anyway!
See that little flower holder?  Gorg, ceramic, and $1 at Salvation Army.
Ah, glorious.  Who knew a lamp could make a girl so happy?!  I scored a whole tub of picture frames from Daniel's Aunt and Uncle (thanks!!), so I'm going to do something like this over the couch:

 Looooove.  Oh, to be a stay at home wife and craft all day!


Monday, August 8, 2011

Tissue Paper Pom Pom {Tutorial}

I saw these pictures of "thrifty" baby nursery decor and fell. in. love.

How much do they cost and where do I get these?!?!!?
Well, Martha Stewart sells kits at Michael's and Toys 'R Us for:

I don't think so (Martha, I adore you, but you are rich and I am not.  My first teaching job paid me in gum.  Okay, not really, but close).  

Let's make them!

You need:
Tissue paper (6-8 pieces per Pom)
Craft wire or Pipe Cleaners
String/Ribbon to hang
Scissors!
  • First, lay all of your tissue paper pieces out on the table, layered on top of one another.

  • Accordion fold the whole length of the paper, starting at one end.  Your folds should be about 1.5inches wide.
I had a pretty handsome helper who proceeded to act like a fan dancer.  Sheesh.  This man makes me laugh!

  • When your paper is folded completely, trim the ends to be either rounded or pointed.  Either is very cute!

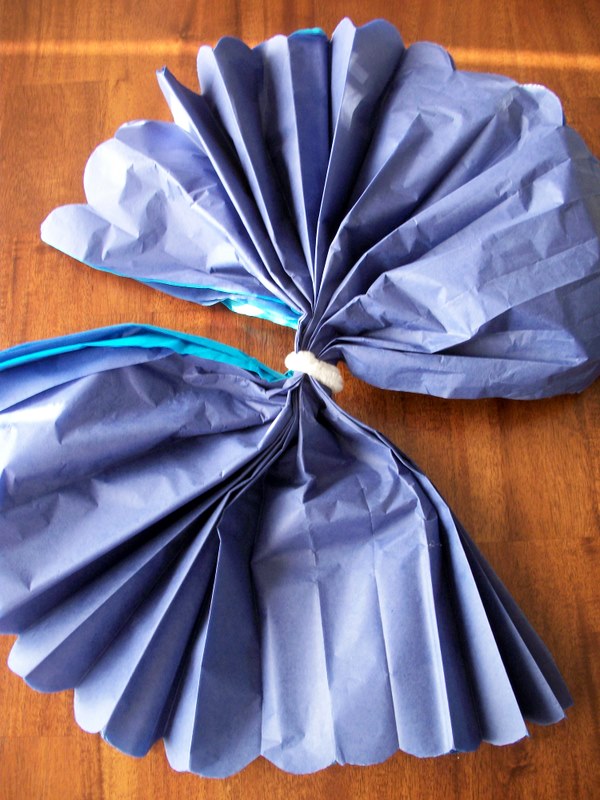
  • Twist your wire or pipe cleaner around the center point.  I cut my pipe cleaners in half because I AM CHEAP, so you need about 6inches of whatever you use.

  • Fan out each side to make the best "circle" you can.

  • Carefully, carefully, carefully, start separating each layer.  I did one of the left side, then one of the right side, then back to the left.  It makes life easier to do it this way.

  • Once you have puffed half of your layers, hold the pom in one hand, grasping the mid point.  Turn it over, and fluff the opposite side the same way so that you have a sphere.
 Annd...
 Please excuse the colors of our Pom.  Daniel wanted to make a "Man Pom"
Boys. will. be. boys. =)
    Woop woop!  So pretty, soooo cheap.  Mine are going in my classroom!  I will post pictures when they are all up.  LOVE it!
    When we start expecting one day (and if it is a girl), I will definitely be putting these into a mobile above the crib.

    Today was the first day back to school.  Something in me died a little knowing I didn't have any "me" time anymore, but part of me had butterflies at the thought of going back to school.  Maybe it's the smell of pencils and tape, the sound of  18 sewing machines drumming to the beat of Celine Dion, or all the fun things I can do (By the way- found a way to incorporate friendship bracelets into a lesson because A:  it is a textile and B:  we will be practicing math skills with it.  Don't judge- my classes are awesome).  Either way, God's put Romans 6:11-14 (we're studying it in Sunday School) on my heart:
    11 In the same way, count yourselves dead to sin but alive to God in Christ Jesus. 12 Therefore do not let sin reign in your mortal body so that you obey its evil desires. 13 Do not offer any part of yourself to sin as an instrument of wickedness, but rather offer yourselves to God as those who have been brought from death to life; and offer every part of yourself to him as an instrument of righteousness. 14 For sin shall no longer be your master, because you are not under the law, but under grace. 

    Of course, I am human and I sin.  I wish I didn't and I try not to, but I do and I will and it won't stop until I die.  I don't want to and try my hardest to stay clear of it because of the new life I have in Christ!  With the Lord's help and the pursuit of Him, slowly I am transformed into the likeness of Him, perfected on the day I stand in his presence.  Anything short of perfecting right now is forgiven, only through the blood of the cross.  This verse reminds me not to sin in my selfishness of wanting to be home, extending summer and not having to go to work.  Instead, I should be thankful for God's provision for my family that allowed me not to have to work this summer and for the awesome job, school, and students he has blessed me with.  My outlook should be that I am an "instrument of righteousness", ready and willing to do what He wants me to do to serve those at school.  What a great calling (and so hard to do sometimes for selfish reasons)!
    I am so blessed to work in my school and am thankful that, although many may not realize it, God reigns over it. He is the reason for my joy!

     
    designed with love by beautiful dawn designs