Friday, September 2, 2011

Freezer Paper Stencil Tutorial

Freezer Paper Stencils- a.k.a The Po' Man's Screen Printing.
When you see this, you are going to freak out!
Screen printing is a printing technique that uses a woven mesh to support an ink-blocking stencil.
Say what?
In screen printing, you start with a "screen"- which is purple here.  They treat the design with a special chemical that will allow ink or paint to pass through onto the fabric, which is stretched and attached underneath the screen.  You "paint" or brush the paint/ink over the stencil (it's not a cut-out stencil- think thinner mesh). The purple parts will not allow the ink to pass through onto the fabric.  The parts that have been treated with the chemical will!  We did this is K-State in my textile class.  SO fun... but expensive.  Instead, we can make Freezer Paper Stencils!

Here are the materials you need:

Freezer Paper (found at Walmart for $5.44.  They only had the jumbo size but, lemme tell ya- you will never have to buy more!)
Foam brushes
Fabric Paint (Tulip Brand I heard is the best.  $1.25 at Michaels)
Fabric
Exacto knife and something to cut on
Iron and press cloth
  • First, cut a piece of freezer paper off of the roll.  Note there is a papery side and a waxy side (although it's not wax- I think it's a glue finish or something)

  • Second, draw a design on the paper side.  You can draw free hand or print and trace.  You can also print directly onto the paper side of the paper from your printer.

I think mustaches are funny and we like them =D
Pretty sure we were engaged at this point.  Love him!
Okay, back to earth
  • Using an exacto knife, cut out the shapes so that you have a silhouette left.  I cut on the back of a notebook using one of my husband's huge construction knives from Home Depot.


  • You should be left with this:


They are now ready to go onto your clothing!
  • Place the designs glue-side down onto your shirt/fabric. Using an iron (without steam), iron it to the fabric, making sure to get every little nook and cranny so that you get a great seal. It only takes seconds to bond.


  •  Using the foam brush, apply paint in the center of the design.  Make sure not to get paint on the fabric around the stencil.
    Make sure to get paint in every little part of the silhouette, all the way to the edge!
    Let it dry for 4 hours before applying a second... or third.. coat.  I would suggest at least 2, 3 or more if you are painting a light color onto dark fabric.  My husband thought you should see what it looks like to craft on a school night:
Woof.  =D
  • So, when you are done painting as many coats as you need, it will look like this:

  • Now is the best part.  For all the scab pickers, pimple poppers, and those who like the sound of the vacuum sucking things up from the carpet (I am all 3 BTW.  I know, sick), this one is for you!  Pull that paper off!  You will be left with...
Pure. Amazingness.  Can you believe how tight of a seal that paper had to make such crisp lines?  I was totally impressed.
  • Last super duper important step.  Ironing.  The heat from the iron will set the paint so that it doesn't come out or fade in the wash.  Iron with a press cloth in between the shirt and iron:
And you are done!

You can make birthday outfits, Pro sports outfits, anything-for pennies, literally. 
Awe. Some.
I'm sewing some yoyos to put on the stems as flowers... but they aren't done yet and I couldn't stand leaving this post hanging in space until tomorrow.  I'll update later!

EDIT:  Here is the Yoyo flower shirt I finally finished!
Ugh- don't you just love yoyos!  I can't wait to see some little toddler waddling around in this!

Keeping It Simple

Wednesday, August 31, 2011

Binkie Clip Tutorial

So... Love for Mondays didn't exactly happen.  =(  Fail.
Between a foot-high stack of papers to grade (yes, sewing teachers grade, too), Etsy orders, house managing (i.e. 5 loads of laundry, dishing, vacuuming, bathroom cleaning, and dinner... on a Tuesday night after school), and celebrating a great day at work for my awesome husband, it. wasn't. going. to. happen.
BUT I will not give up.  I will be loving Monday next week (remind me that I said this come Monday morning when I am dragging my feet into school!).
Before I start this sucker, I wanted to show you some new blogs I've found... and LOVE:
  • Kristina J- This one has some really awesome and cute sewing tutorials.  This chick loves Anthropologie (me lovey!), so she often refashions cheaper clothing to look like Anthro stuff (which, if you aren't familiar, is prriiiiiiiiicey).  I am planning on doing This to one of my shirts:

Please and thank you!
  •  Little Miss Momma- SO you just need to go here.  I am obsessed with this blog!  There are so many great tutorials at this site- I want to do them all.  
 Okay- ready for this?  It's not the most exciting tutorial, but it's still a great one.  I am working on some exciting ones for later in the week.  Enjoy!

Here are the supplies you need:

FYI- I ordered these clips on ebay and got them for $.10 each, rather than $1.50 each at Joanns!
First, lay your ribbon on the ironing board.  Fold the end down about 1/2 inch and iron it down.  Lay your fabric right side down on the ironing board.  Iron one of the short ends down about 1/4 inch to the wrong side, as shown:

Lay the ribbon on top of the fabric so that the folds are facing one another, as such:
As you can see in the picture above, fold in each side of the fabric just to the edge of the ribbon.  Iron down.  Fold again so that the sides overlap the ribbon:

With your machine, stitch each of these folds down onto the ribbon from one end to the other:
One end will look this way-this is the end you need to focus on right now!
 Fold the skinny minny ribbon in half and place into the space you created by sewing your folds down.  This should be the side of the ribbon/fabric that you folded.
Sew across to secure the ribbon:
The other end of the ribbon/fabric strip looks like this- and you need to stitch a zig zag across it.
Trim it down and thread through the clip like this:
Stitch a square around this folded part so to secure the clip:
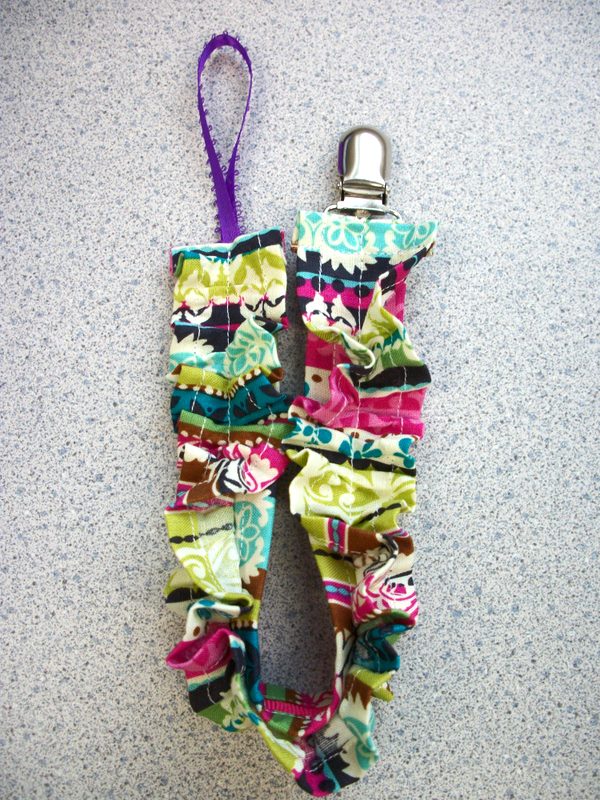
Finished!
I made a ruffled and stitched it on top and looooooooooove it!

This was part of an Etsy order for some twin girls (so sweet!), so this is what was sent:

Oh my goodness.  Adorable.  These clips are great so that binkies don't fall on the floor and get all germie.  I don't have a baby to use them on, but I know Miss Claira wears them often!

Is she not perfect?  I think so!

Here is a teaser of what will come later this week...
Applique!
Peace out.

Wednesday, August 24, 2011

Yo Yo Tutorial

Yo Yo....YO!  Check it out!

Yo yos?
What?
Yes, these little tiny circles of gathered cuteness are called Yo Yos.  I just adore them.  How cute are they?  They are SO easy to make- I teach my kiddies how to hand sew for the first time with this pattern.  We make one for the center of our pin cushions (it's stuffed with.. well, stuffing... and the hole-side is glued down.) and I thought they would be precious on a onesie for my niece-to-be Autumn =)

 You need:
5 inches (less/more, depending on size) of cute fabric
1 Sewing needle
Thread to match

  • First, decide how big you will want the Yoyo once you have finished.  I cut circles out of notebook paper and laid them out on the onesie for visualization.  Once you know the size you want, measure the diameter of the pattern circle.
  •  Mine measured 2.25 inches.  Double this number.  The doubled number will be the diameter of the pattern you need to cut for your fabric.  Because we are making a little "shower cap" of fabric (this is what we call it in my classroom!), we need enough fabric to be gathered to the center and still have the diameter we want- thus, you have to double it.  My new pattern is 4.5 inches in diameter.
You will noticed my finished yoyos are smaller than my "test" ones I laid out.  This is because I thought "Really?  TWICE the diameter?"  I made this one 3.25 inches in diameter and they seriously. are. smaller.  Double your measurement.  Trust me!
  •  Cut out your cute little circles =)
  •  Cut a piece of thread long enough so that you can double thread and knot your needle and sew around the entire circle.  I eyeballed that, so I don't know how long my thread was.  Sorry!  Place your circle on the table with the wrong side facing you.  Fold the edge towards you 1/4 inch.  Sew a running stitch all around the circle, folding as you go.  You want to sew as close to the folded edge as possible. 
I put my needle through several stitches at a time and then pull the needle through.  It is so much faster!

  •  This sounds backward, but the looser or farther apart you sew your stitches, the smaller the hole will be- or the more room there is to pull your stitches together.  If you sew your stitches really close together, your "gathering hole" will be rather large.  You don't want that!  Sew loose stitches- it looks better and is faster!
  • Once you have finished sewing the entire circumference of the circle (man, this tute is full of math vocab!), it should look like this:
  •  Do not knot your needle thread!  Take your needle and gently tug towards you so that the stitches gather.  Once completely gathered, they will make a little "shower cap".
  •  Knot off and cut your threads.  Finished!  Stitch to a onesie, shirt, or headband (I made a matching headband but it's not pictured!) and you have one cutie pie of a baby!
Neckline or corsage?  So many options.  I think I'm going with the neckline.
 Dear Lord, please begin to prepare for me a little one who will grow to love you so... and love wearing homemade fashion as much as I love sewing it!
designed with love by beautiful dawn designs