Freezer Paper Stencils- a.k.a The Po' Man's Screen Printing.
When you see this, you are going to freak out!
Screen printing is a printing technique that uses a woven mesh to support an ink-blocking stencil.
Say what?
In screen printing, you start with a "screen"- which is purple here. They treat the design with a special chemical that will allow ink or paint to pass through onto the fabric, which is stretched and attached underneath the screen. You "paint" or brush the paint/ink over the stencil (it's not a cut-out stencil- think thinner mesh). The purple parts will not allow the ink to pass through onto the fabric. The parts that have been treated with the chemical will! We did this is K-State in my textile class. SO fun... but expensive. Instead, we can make Freezer Paper Stencils!Here are the materials you need:
Freezer Paper (found at Walmart for $5.44. They only had the jumbo size but, lemme tell ya- you will never have to buy more!)
Foam brushes
Fabric Paint (Tulip Brand I heard is the best. $1.25 at Michaels)
Fabric
Exacto knife and something to cut on
Iron and press cloth
- First, cut a piece of freezer paper off of the roll. Note there is a papery side and a waxy side (although it's not wax- I think it's a glue finish or something)
- Second, draw a design on the paper side. You can draw free hand or print and trace. You can also print directly onto the paper side of the paper from your printer.
I think mustaches are funny and we like them =D
 |
| Pretty sure we were engaged at this point. Love him! |
Okay, back to earth
- Using an exacto knife, cut out the shapes so that you have a silhouette left. I cut on the back of a notebook using one of my husband's huge construction knives from Home Depot.
- You should be left with this:
They are now ready to go onto your clothing!
- Place the designs glue-side down onto your shirt/fabric. Using an iron (without steam), iron it to the fabric, making sure to get every little nook and cranny so that you get a great seal. It only takes seconds to bond.
- Using the foam brush, apply paint in the center of the design. Make sure not to get paint on the fabric around the stencil.Make sure to get paint in every little part of the silhouette, all the way to the edge!Let it dry for 4 hours before applying a second... or third.. coat. I would suggest at least 2, 3 or more if you are painting a light color onto dark fabric. My husband thought you should see what it looks like to craft on a school night:
 |
| Woof. =D |
- So, when you are done painting as many coats as you need, it will look like this:
- Now is the best part. For all the scab pickers, pimple poppers, and those who like the sound of the vacuum sucking things up from the carpet (I am all 3 BTW. I know, sick), this one is for you! Pull that paper off! You will be left with...
Pure. Amazingness. Can you believe how tight of a seal that paper had to make such crisp lines? I was totally impressed.
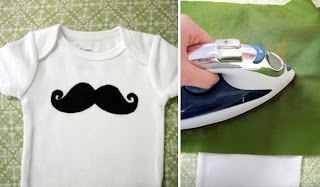
- Last super duper important step. Ironing. The heat from the iron will set the paint so that it doesn't come out or fade in the wash. Iron with a press cloth in between the shirt and iron:
And you are done!
You can make birthday outfits, Pro sports outfits, anything-for pennies, literally.
Awe. Some.
I'm sewing some yoyos to put on the stems as flowers... but they aren't done yet and I couldn't stand leaving this post hanging in space until tomorrow. I'll update later!
EDIT: Here is the Yoyo flower shirt I finally finished!
I'm sewing some yoyos to put on the stems as flowers... but they aren't done yet and I couldn't stand leaving this post hanging in space until tomorrow. I'll update later!
EDIT: Here is the Yoyo flower shirt I finally finished!
 |
| Ugh- don't you just love yoyos! I can't wait to see some little toddler waddling around in this! |


ummm LOVE LOVE LOVE. I will definitely be making some of these. Dang your kiddos are gonna have cute things. Thank you so much for your etsy order and more importantly the note. It was really encouraging. Thanks for praying. We really really feel the prayers and God's presence in all of this.
ReplyDeleteoh...p.s. who looks that cute crafting? I usually am still in my jams and my hair looks WAY worse that your "really bad hair" oh and these days I am covered in spit up. =)
ReplyDeleteYou may want to mention putting some cardboard underneath what you are painting so it doesn't bleed thru
ReplyDeleteThis is great. I used freezer paper to create a pattern on a dress.
ReplyDelete