Showing posts with label Frugal Living. Show all posts

Saturday, March 17, 2012

Garden Party

Last Spring was the first we had in our new house and, although I really wanted to have a garden, we decided not to.  We had some other landscaping to do and pay for, so we thought it best to wait a year.  I thought that year would never come, but it's finally here!

A few weeks ago we picked out some seeds.  We are planting:
  • Tomatoes
  • Cherry Tomatoes
  • Jalapenos
  • Bell Peppers (the "surprise" packet with purple, red, orange, yellow, green, and white ones.  Who knows what will sprout!)
  •  Cantaloupe (Daniel's idea.  He is obsessed)
  • Green beans
  • Cucumber
  • Radishes
  • Sweet Basil
  • Parsley
  • Cilantro
  • Oregano
  • Blueberries and blackberries (Technically bushes.  We won't actually see their fruit until next year =(  Oh well!)
Today, we went and bought a seedling kit, soil, vegetable and fruit "food", and a watering can.  We started our seeds in the kit and will be growing them inside until we are safe from a hard frost, the seeds germinate, and are ready to be planted in the ground.  I will write about that when the time comes!
Here are all of our supplies:

Here is what we did:
 First, we used a silver sharpie to label each "group" of cells so we know what plant it is.  Then we filled each cell with soil without packing:
 Then, we put one seed in each cell.  Some of the seeds were tiny, some were huge!  We poked them down with our fingers until the seed was about half way down the cell.
Cover it back up with more soil.
We did the same thing with herbs, but we planted them in little pots and will keep them by the window in the kitchen.  We planted several herb seeds in each pot because the pots were so big.  Once done, water until you see it just leaking from the bottom (if using a pot with a tray) or until the soil is thoroughly damp:
The package claims that if you put the plastic "lid" back on the cells, it creates a greenhouse effect.  Hmm.  We will see! We have no great spot for sunlight in the house, so we are being hoosiers and keeping them on TV trays by our back door.  I'm sure company will think we are growing pot.

Can't wait to update you once our babies start to grow.. and share recipes using them!  So much of our grocery bill is fresh produce.  We will still have to buy some, but this will save us a lot of money!
Once we have kids, I think we will add more variety like carrots and peas and make our own baby food out of our own garden.  That and cloth diapers?  We are turning into total hippies.

Next week I will be starting a bread series, baking and reviewing several recipes.  The base for this bread is so easy and the dough can be stored in the refrigerator for 2 weeks before baking.  No kneading.  You will love it!

Thursday, March 15, 2012

DIY Chicken Stock


We like chicken.
A lot.
Our dinners usually consist of either roasts, 93/7 ground beef or chicken breast.  Seems pretty boring, but we actually get pretty creative.
Every once in a while, I will buy whole chickens when they are on super sale and roast them.  Sometimes we eat just roasted chicken, sometimes we "harvest" the meat, pull it, and freeze it for easy dinners later (quesadillas?  Enchiladas?  Soups?).  I used to throw the bones away, but I started making my own chicken stock and can't believe I haven't done it before.  It is SO easy and I trick myself into thinking it's free because we really bought the chicken for its meat.  Like it even more.
Here is how.

First, prepare and cook your bird (i.e. rinse and take out insides.  I suppose you could use the insides for your stock, but I think they are geeee-ross).  You can roast it, or you can cook it in a crockpot all day with any yummy seasoning you like.  I usually dump garlic, onion powder, parsley, lemon pepper, salt, normal pepper, paprika, and anything else I see in my spice cab.  If you cook it in a crockpot, fill the bottom of the pot with 2 inches of water before cooking.  Cook on low for 12+ hours.


Second, take off the meat.  Eat it or freeze it.  Save all the skin, bones, and etc.  Leave the extra juices in the crock pot.

Put the bones and etc. back into the crock pot.  Add:
  • 4 peeled and quartered whole carrots
  • 1 onion, peeled and quartered
  • 4 quartered stock celery
  • GARLIC (i used like 5 tbps of pre-minced.  Don't judge)
  • 2 tbsp dried parsley
  • 2 Bay Leaves
Pour enough water to fill it to the top.  Cook on low 12 hours.  I did this overnight.  Nothing like waking up to fresh brewed chicken stock.

Pour through a sieve into a separate bowl.  Toss all of the "bits".  You should be left with pure stock!

Chill in the fridge and skim off the fat from the top once it's hardened (the fat, not the stock).
I freeze them in ice cube trays or separate freezer bags so that I can use different parts at different times without waste.

And there you go.  DIY stock.  We ended up making some killer chicken tortilla soup.  If only everything else in life were so easy.
Skip To My Lou

Monday, February 6, 2012

Ways to Save: Frugal Wrap Up

Source

Ya get it, I'm cheap.  I like to save money.  Sometimes out of necessity, always for the thrill.  Besides the posts I've shared on being frugal over the past week, I thought I'd share a few ways we save money around our house:

  • Make a budget.  Daniel did this for us, but it's fairly easy to put together.  The hard part is sticking to it!  We looked at our monthly income, then our necessary and extra expenses.  Daniel allotted enough money to cover our necessary expenses, tithe, missions, and money to be put into savings, then figured how much we could spend on all of the "extras".  Each category has a set amount we can spend.  When we save in one category, we can use those funds to cover extras/unexpecteds in another.  For example- we have TONS of gifts to give December through Feb because of birthdays, Christmas, and anniversaries.  We don't, however, spend a lot during those months on groceries (I know, that sounds weird, but we are always out of town and eating with family.  Plus, we have LOTS of leftovers).  So, extra we don't spend on groceries goes into the gift fund.  If we can be cheap on everything, we put more money on payments for cars, loans, etc. so they can be paid off quicker.
Mine.  Love it.
  • Line dry at least 3 loads of laundry per week.  Daniel and I both wear business attire to work, so I usually line dry those things anyway so they don't get ruined or shrink.  We have definitely noticed a decrease in our electric bill since doing this. I scored a garment rack for free when we moved church buildings (it was left behind) and I hang things to dry in our laundry room.  I saw it at Walmart for $37, but it is well worth the investment in my opinion (plus, great for hanging clothes at garage sales for easy shopping!).  As I posted, we make our own laundry soap, which only costs us 4 cents per load, whereas store-bought is upwards of $.15.  This doesn't sound like a big deal per load, but think about it- we do laundry for 1/3 of the cost of the cheap laundry soap.  Nevermind Tide.
  • Grocery shop and cook strategically.  I guest posted at Simply Prudent about this very thing and it saves us a ton of money. Check it out!
  • Buy in-season.  While we are on the subject of food, I will tell you that shopping for food that is in season will save you a lot of cash.  Unlike my lovely mother, if blueberries are not in season and cost almost $4 for a 1/2 pint, we simply go without.  Be creative and force yourself to find new recipes for foods that you can get inexpensively.  When I plan to grocery shop, I look to see what I can get the best deal on, then I plan meals with those ingredients.  This saves me from having to buy expensive ingredients for meals I've already planned on making and don't have the ingredients for.
  • Recycle and Reuse containers.  I save all sorts of containers to be reused as tupperware and random-use storage.  When we pack lunches, I try to use as much tupperware as possible so we don't have to waste lunch baggies (and I have been known to rinse those out, too.  I know, pathetic.  Can't help myself!).  Some weeks are better than others.  Lunch meat containers and butter tubs are the best!
  • Buy used.  Hunting through thrift stores is one of my all time favorite things to do.  I don't remember the last time I bought anything from our wardrobe or home full price, let alone from a retail store.  It really keeps costs down!
  • If you can DIY, then DIY.  That is, only if it saves you money.  Don't be fooled into thinking everything that is "DIY" is cheap and will save you money.  Sometimes it is cheaper to have someone do something for you or go somewhere to have something "done".  I do my own French Pedicures for free (last night!), but we paid to have some new furniture delivered last year because the charge was cheaper than renting and truck and paying for the gas.  Use your common sense.
  • Use couponsWait, I thought you hated couponing?  I do.  BUT, we usually only go out to eat if we have a coupon.  They are easy to find and several restaurants have them online or give free meals for birthdays and other special occasions.  There is no reason to pay full price for a meal out when you can get it half price (or free)!
  • Use cash gifts wisely.  We always wait a certain amount of time before spending a large amount of money so we can "sit on it" and see if we really need it.  Either that, or we have a list of things we "need" long term and purchase with these gifts.  For example, we bought a deep freeze with Christmas money.  You wouldn't think it would be exciting (Oh, how it was!), but we will definitely need it long term once we expand our family (we were already busting out of the freezer attached to our fridge!).  Any extra money that comes in usually goes towards paying off our cars and students loans so that we can work towards being debt free.
  • Keep a "Good Deal" book, whether it's tangible or mental.  I have been so cheap for so long that I know when something is a good deal.  Don't be fooled by sales and grocery items that end up in the weekly circular.  Sometimes companies pay for a spot in the circular and items are shown for their regular price, but people are fooled into thinking they are on sale because they are "featured" items.  Na uh.  When you find something for a good price, buy it if you need it or use it regularly.  Don't buy something you don't usually buy just because it's a good price for what it is.  This is why I hate couponing.
  • Find Free Entertainment.  I always check local magazines for free events for us to go to-concerts, festivals, outdoor movies, farmers markets, you name it (KC Parent is a great source for Kansas City folk!). They are more widely available during spring and summer, but they're still out there.  We like to rent things from the library, too.  Pretty sure I have seen every single episode of Roseanne thanks for our Library!
  • Be content with what God gives you.  I know, easier said than done.  But, this really works for us.  When we think we have to have something, we step back and say, "in the scope of eternity, will this matter?  Usually, NO.  Do I want this because I need it, or because I want other people to see me with it? Usually it's the second, which makes me realize I am being a brat.  Will this, in the long run, save us money?  If so, it makes "the list" (such as the freezer).  God commands us to be content and not covet, which is something I personally struggle with.  Knowing that God has a specific plan for my life-that ultimately Christ will be glorified (hopefully.  It will happen regardless of whether or not I choose to partake in that blessing!)-helps me to rest assure that I have what I need, will be taken care of, and blessed along the way in His timing.  We don't love Jesus because He will bless us.  We love Jesus because He first loved us while we were still sinners.

Welp, that's my two-cents worth on being frugal.  This works.  For us.  I hope you can adapt something-or at least get ideas- on how to be cheapskates like us.

Here are all of the links to the various recipes we talked about:


So long!

Sunday, February 5, 2012

Frugal Home Series Part 6: How to Cut Men's Hair

I apologize for the lull in this series.  The past few weeks have been difficult ones for us, but here we are again!  =)

Frugal Home Series Part 6:  How to Cut Men's Hair

Hair is just something we don't value much.

Daniel:  "What is that supposed to mean?!"  =)
True, his hair is thinning (even though he has a ton of it and it goes extremely fast) and I was born bald and didn't have much until I was 2 or 3 (and still don't).  It isn't something we care to spend a lot of money on.
I get my hair cut at Great Clips or Fantastic Sams (I can hear the gasps out there!) because I always just get everything trimmed (never dyed my hair and don't plan on starting!).  To be honest, I wear my hair wavy/curled anyway, so even if a layer here or there is uneven, ya can't tell.  I spend about $10 every two months.

And Daniel?  Well, I cut his.  I didn't know what I was doing when I started, but I've been doing it for 4 years now and he hasn't gotten it cut elsewhere since. 

Before we started dating, Daniel had a curly fro.  I feel in love with him immediately, but woof.  I hated that hair.
This was when he was in high school, years before I met him and I'm sure he didn't get a single hair cut between this picture and the time I met him.  Look at that height!  Ha.  What a handsome guy.  Lucky girl!

He must have caught wind of it, because he went and got it cut right before he asked me out on our first date.  Well, first of all, the gal that did it clearly didn't know what she was doing.  It was uneven and the top didn't blend well with the sides.  It was better than before and grew quickly, but I figured- meh, this can't be that hard.  Now, I cut it just the way he likes it (and just the way I like it).  And, it's our favorite price- FREE!

This is what you will need to buy:

I have had to buy replacement shears because someone stole them and cut paper and dulled them up.  :)  Either way, it's about a $10-$15 investment at Walmart.

First, wet the hair.  Daniel puts his head over the tub.

Second, I section Daniel's head into 3 areas- A, B, and C.  We will cut them in that order and then go back and trim up the sides.

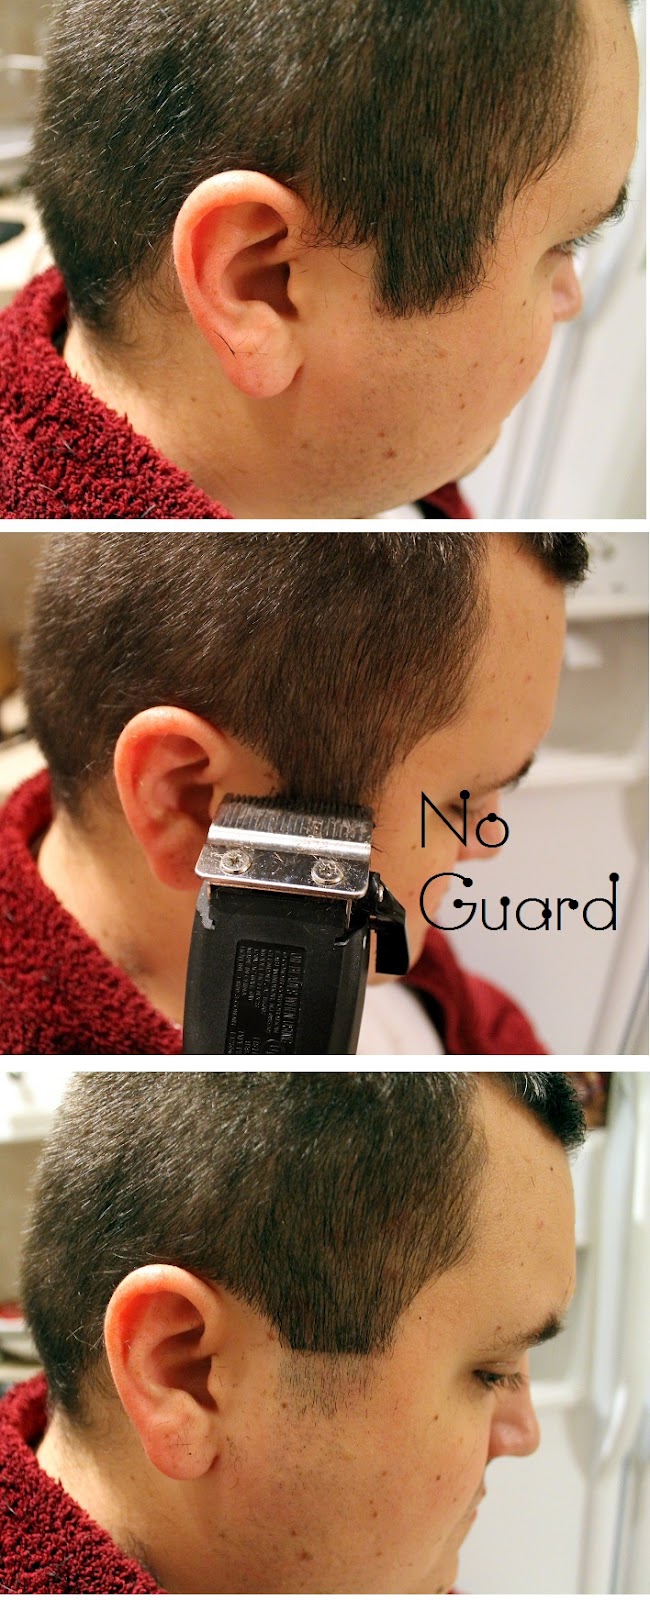
I use a 3/8 inch guard on the back and sides for section A.  A is the back of his head and sides up to the "crown" of his head.  Make sure you get every hair!

Then, I use a 5/8 inch guard to cut section B to "blend" section A with the top.

Then, I use a comb and shears and trim section C by hand.  I usually cut it as close to my fingers as I can, then make sure it blends well with section B.  I also trim the hair above his ears with the shears because I.. woops.. made a big boo boo when I tried to do it with the buzzers once. 

Now, trim any extra hairs around the face.  I comb his hair down and trim in this pattern:
Daniel calls this his "comb over".  I just think it's plain handsome.
 Now, take the guard off the buzzer and trim the sideburns, sides, and back.


Done!  Free. Because his hair grows so fast, I cut it about once a month.  This saves us $10/month.

Thanks to my dear hubs Daniel for starring in this post.  Love you!

Monday, January 30, 2012

Frugal Home Series Part 5: Homemade Foaming Hand Soap

Frugal Home Series Part 5:  Homemade Foaming Hand Soap

Is it just me, or does it seem like washing your hands with foaming soap is easier than with regular liquid soap?  Pretty sure you're still supposed to scrub your hands to the tune of "Happy Birthday" regardless of which soap you use (I never do.  I know, awful), but I feel like I am more inclined to wash more thoroughly (or wash at all) if the soap of pre-foamed.  Call me crazy.

I hate paying extra for foaming soap, though.  Plus, I always find luxury soaps for cheap at places like TJ Maxx, Marshalls, and Home Goods, but they aren't foaming soaps.  Solution?  You guessed it!  Make your own!

Ingredients:
  • A few pumps of regular liquid soap
  • Water
  • Empty foaming soap dispenser
I madeover a Target $1 pump to look more shnazy over the summer, but you can use any one you have on hand.

  • First, pump enough soap into your dispenser to fill it about an inch high. 
  • Second, fill the rest with water. 
  • Put the cap on, give it a shake, and you are done!  It is that easy. 

I will say that you will need to shake it up from time to time, but to be able to fill it with soap we have on hand for free is worth the extra shake.

Wednesday, January 25, 2012

Frugal Home Series Part 4: Homemade Liquid Hand/Body Soap

Frugal Home Series Part 4: Homemade Liquid Soap
Today's tutorial isn't for anything that includes borax, vinegar, or soda of any kind. No, it's liquid soap. Did you know you can make a gallon of liquid soap from just 8 oz of bar soap?  Yep, it works.

My Grandma gave my sister and I a Philosophy gift set with body wash, hand cream, a bar of body soap, perfume, and lotion.  I really wanted the perfume and lotion and Chris wanted the body wash and hand cream, so we split it down the middle and I got the bar, too. I  hate using bar soap.

Have you ever used Philosophy products?  They smell so good.  I can't describe it.  It's not floral or sweet- just clean and beautiful.  But, you know how much that body wash costs?
$17 for 8 OUNCES.

Love it, but I love the food in our fridge and the roof over our head a little more. So, I figured- let's take the bar I won't ever use and turn it into body wash!  Here is how:

You need:
  • 8 oz of bar soap (Any bar.  Read the label to make sure your are using 8 oz.  For some soaps, that's one bar, for others it is 2 or 3!)
  • 2 Tablespoons of Glycerin (found by the bandaids.  You will not find it by the soap.  Trust me on this!  Invest in the $3 bottle and you will have enough for gallons of soap!)

  • 1 gallon (or 16 cups) of water
  • Stock Pot
  • Container for soap (trusty milk jug for me!)

First, Grate your soap like it's cheese.  You can use the same technique I used when I made laundry soap.  My soap was rich and would not grate (okay, I don't own a cheese grater.  I have a micro plane and it wouldn't work).  I chunked it and it worked fine.
Put it in a stock pot with the water and glycerin.  Heat on medium heat until all of the soap is dissolved.  This will go by faster if you grated the soap.

When all is dissolved, you will have what looks like soapy water.  Don't worry- you are on the right track!

Take off the heat and let cool/coagulate for 10-12 hours.

It should be like thick snot now.  Beat with a hand-held mixer, adding as much water as you want in order to get your desired consistency.  At this point, I added extra perfume to smell extra pretty =)

Funnel into container and you are in bid-naz!

I found Dial Men's care bars- $2 for 3 bars for my husband.  Smells super manly and you will only use 2 bars, which means a gallon of men's body wash costs a whopping $1.34.  He loves it.  Hoo-rah.

*Edit 3.26.12
Yes, the soap is going to be a little "snotty", no matter how much water you add.  It also doesn't foam well, but suds does not equal clean.  In fact, some company add foam boosters to soaps and laundry detergents because we, as consumers, have been brainwashed into thinking suds does equal clean!

Skip To My Lou

Tuesday, January 24, 2012

Frugal Home Series Part 3: Homemade Dishwasher Detergent

Frugal Home Series Part 3:  Homemade Dishwasher Detergent

I have always been disgusted by how much it costs to wash dishes with the dishwasher.  Even sicker at the thought of wasting money on "convenience" dishwasher tabs (okay, I'll admit.  I used to buy them in my couponing days when I could get an 18-pack for $2.  I hate couponing now!  I would always convince myself I could have something name brand because I got it cheap when couponing.  Whatever.  I spent too much and bought things that weren't very healthy.  Sure, I can get 10 packs of hotdogs for 10 cents.  But really?  Hotdogs?  My allegiance will always be to good 'ole Aldi!). 

Pinterest is chalk full of dishwasher detergent recipes.  Several of them call for citric acid, koolaid, and other concentrated items that come in tiny glass bottles and cost a pretty penny.  This recipe?  Easy Peasy.  Cheap.  If you already invested in borax, washing soda, and vinegar, you already have all of the ingredients except for one {cheap} item.

Dishwasher Detergent
Ingredients:
1 cup vinegar
1 cup Borax
1 cup Baking Soda (or, even better- washing soda!  Either work)
2 Tbsp Lemon Juice Concentrate in the lemon-shaped bottle (technically citric acid in a tiny {plastic} bottle, but SO much cheaper!)

Mix all ingredient together (use a BIG bowl.  That vinegar and baking soda will rock it out!) and store.  I used an old detergent bottle I had saved for this very occasion.  Shake to mix before each use.

**Please note that you will need to rinse your dishes before loading.  Apparently you are always supposed to do this?  =)  I say this because my husband usually is the dish-loader in our family and I do just about everything else (We've had some clothes.. ehhhem..  ruined. =D) (and I don't mean to say my husband makes me do everything.  I love my home and taking care of it.  Sometimes we argue because I don't want him to help because I love it so much.  And he works hard.  My way of serving him to make up for all the times I am a total b-rat). He says I am the worst dishwasher-loader of all time.  Too many dishes.  Nothing is rinsed.  Salt and Pepper (or something) particles on tops of cups when dry.  Woops!

Other than having to rinse, it works wonderfully.  Even glass was nice and shiny, no residue!

If you want to boost the rinse cycle (which I always do), add 2 tbsp pure vinegar to the rinse/jet dry dispenser.  It is awesome!  Seriously, who would have thought something so bitter as vinegar could be so sweet?!

Monday, January 23, 2012

Frugal Home {Guest Post}

We're taking a break from frugal home care tips today to talk about frugal meal planning.

I've written a Guest Post today at Simply Prudent about how to not only frugally meal plan for your family, but how to also save time during the busy week by investing an hour or two on Sundays getting things organized.

The writer for Simply Prudent is my dear friend, Jenni.  By "friend" I mean I actually know her in real life.  I love having blogger friends- we can share tips, write guest posts, and laugh about jokes only bloggers will get (As in "Oh, did you see what so-and-so's baby did the other day?  She is so cute.  I can't believe how big she is getting", as if we know these people.  It's similar to the I-refer-to-celebrities-by-first-name-like-we-are-friends phenom).  =)  

Jenni, thanks for the opportunity to contribute to your awesome blog!
Check the post out here and become a {blessed} follower of Simply Prudent!

Sunday, January 22, 2012

Frugal Home Series Part 2: Homemade Fabric Softener

Frugal Home Series Part 2:  Homemade Fabric Softener

I'm definitely a liquid fabric softener kind of gal.  In college I took the best textiles class ever- we learned how fabric was made and how to care for it.  Once a week (maybe twice?  I can't remember!) we had a "lab" where we sat in a circle, touched fabric, and learned how to identify it.  We learned how it burns, how it reacts to dye, and how they make carpet.  Best class of my life.

Our professor did/does research for some big-name brand like Lands End or Northface and preached about fabric softeners.  How liquid is much better than sheets, how not to use too much.  My mom always used Downy, but I have to admit- I can't handle the price and it almost always lasts half the time the bottle says because I use way too much.

Solution- Make your own.

I found this recipe and was skeptical.  Really?  Hair Conditioner?  Cheap Hair conditioner? VINEGAR?  I feared I'd be walking around smelling like a Å opský salát (google it).

Nope.  Pure awesomeness.  My clothes are SO soft- softer than with store-bought- and smell fresh and clean.  The scent of the conditioner is definitely there.  This recipe makes a lot of softener, so I only made half.  This is the full recipe.

Recipe:
  • 6 cups HOT water
  • 3 cups white vinegar
  • 2 cups Suave Conditioner {or other favorite scent-I found it for $1}
Directions:
  •  Measure out conditioner.

  • Whisk together hot water and conditioner.  Make sure the conditioner is mixed completely with the water- no clumps.  I had to whisk for a minute or so.

  • Add Vinegar and mix well (this is the actual softener- the conditioner I think it just for scent.  Vinegar also helps with static sling).
  • Use 2 tbsp in a Downy ball or in the softener dispenser in your machine, diluted with water (basically use it like it's store bought)
I keep it in this carafe (end of summer sale at Target for $1!) so it's easy to pour into our washer.

Love. It.  I don't think I've ever been so happy with a DIY cleaning remedy as I am with this one!
Here is a printable label:

Enjoy!

Skip To My Lou

Saturday, January 21, 2012

Frugal Home Series Part 1: Homemade Laundry Detergent

Frugal Home Series Part 1:  Homemade Laundry Detergent

I love me some laundry.  It reminds me of my mom.  She loves it, too, and growing up our house always smelled like clean laundry detergent and softener.  Our clothes were always perfectly cared for, folded when they were warm so that they wouldn't wrinkle.  She never taught us how to really do laundry until it was time to go to college.  I thought it used to be because she didn't want us to ruin our clothes (or hers), but I really think it was because she loved to do it.

{Side story- when we were living in Prague, my Mom and Dad had to fly to the states to go house hunting in Kansas.  I was a sophomore in high school and my brother was a freshman in college.  My sister was 13.  My parents left Danny me in charge for a few days while they were out of the country.  It was awesome- I cooked, cleaned, and did laundry (thanks to a cheat sheet my mom left for me!  This is where my love affair with laundry began). I made sure the doors were locked at night, that we made it to school every morning, that we had lunch money (which had to be rationed because the star of this story hoarded her lunch money for a week to pierce her belly button when she was 13.  Yeeep).  Mini-mom at work.  It went great, except for when my little sister decided to sneak out of the house, run downtown with one of her friends, and then go "missing" for a few hours until her friend's sister tracked them down.  O. M. G. what a brat.  You might be thinking, "WHAT were her parents thinking?!"  My brother was in college, so I don't think they were thinking anything except that we are great kids and I was born with the soul of a 30-year-old (so says my mom).  That Chrissy- always been a rat!  Gotta love her!}

Anyways,detergent.
In the fall, I made dry detergent with my students (they loved it, as did their parents) and used it until I ran out (I loved it, too).  Can I make a confession?  Even though it's not true, I feel like dry soap doesn't get things as clean as liquid does.  Lame, I know.  It's in my crazy head.
SO, I figured I'd try making the same detergent, but in liquid form.  Love it 10x more!


Ingredients:
I left the baking soda out this time, but if you want BRIGHT whites, add 1/2 cup to the whole mix.
  •  1 Bar Fels Naptha Laundry Soap {not natural, but only $1!  If this irritates your skin, or your baby's, then my sis-in-law uses 2 bars Ivory and you can also use Castile.  I made some with Ivory as well and love it, too.  Don't use anything with a lot of oil- it's awful for your clothes (but great for your skin!)}
  • 1 cup Borax
  • 1 cup Washing Soda
  • 1 gallon + 1 pint water
  • Optional- 1/2 cup baking soda
Directions
  • Grate the bar of soap as explained in this post (cheese grater!).
  • Bring a quart of water (4 cups) to a boil on the stove and slowly add the soap, stirring gently (not all at once.  Trust me).
  • Reduce the heat and let it simmer gently until all of the pieces of soap are melted/dissolved.

  • Add the borax and washing soda and stir until they are dissolved.
  • Pour the soap/borax/soda mixture into a large container and slowly add a gallon of hot water to it.
  • Stir until the mixture is well mixed.
  • Let it sit overnight. It will "gel" together.
  • Stir or shake the soap each time you use it.
  • Use 1/4 cup for a front loading washer. Use 1/2 cup for a top loading washer. 
There are 16 cups in one gallon.  We made 1 gallon + 1 quart, which is 20 cups total.  One load is 1/2 cup, so this recipe will make 40 loads.  Total cost is:
Bar of soap:  $1
Water:  Free
Borax: $.34 (9 cups per box, $3 per box.  We use 1 cup)
Washing Soda:  $.40 (same reason as Borax)
=
$1.75 for 40 loads, or about a nickel per load.
Using Ivory soap is even a little cheaper.
Yes.

The dry detergent post I linked to will have a printable, or you can use this one!


Next- Cheap, amazing fabric softener.  You are going to hide in a cave in embarrassment after you see how much money you are wasting on Downy!

*Edit 3.25.12:
The first time I made this, it came out to be a nice, consistent thickness without any "glops".  I think it's because I was so anxious for it to cool and be ready for use that I kept shaking it.  Since then, I have made it countless time (I have been using this detergent for several months and love it more and more everyday!) and there are several "glops".  Now, once cool, I like to run it through a sieve so it's a nice, even consistency.  Works like a charm.
I have been making batching with Ivory soap to use on my gentle cycle in place of Woolite and it's great.  For a full batch, I use 2 bars of soap.
A recycled gallon-size vinegar container is the perfect storage!


Skip To My Lou

Wednesday, January 18, 2012

Frugal Home Series

Over the past few weeks I've been experimenting with some DIY recipes for home cleaners.  All I have to say is WOW.  There are so many natural and cheap ways to clean your home that I often catch myself saying out loud, "Wow, God, you really knew what you were doing when you made creation".  Well, Duh.
 I thought I would share some of the "recipes" I use over the next week or so in a series.
Yep, a series.  Never thought I would do that!  It's called the "Frugal Home Series".  I'm not so much concerned with naturally cleaning my home (although it is a plus in some of the recipes!).  I'm more concerned with cleaning my home cheaply.

A lot of DIY home cleaning products include the following "ingredients".  The majority of DIY cleaners have Borax, Washing Soda, Water, and Vinegar, or any combination of these 4 (plus or minus soap in some cases).  As far as I am concerned they are bomb and I wanted to know where these natural things came from.  So, here is a little background info for you:
Borax
Borax is a naturally occurring mineral composed of sodium, boron, oxygen and water. Borax is generally found embedded deep in the ground, along with clay and other substances.  According to 20 Mule Team Borax, it improves cleaning power of detergent, helps remove tough stains, is a natural alternative to colorsafe bleach, deodorizes and freshens, and naturally softens hard water.  You can use it in the bathroom to remove Soap Scum, Hard Water Deposits and Dirt, and eliminate odors- same with the kitchen.  Cleaning gold


Washing Soda 

 According to Arm and Hammer, Washing soda adds extra cleaning and freshening power for tough household jobs. Works as a laundry detergent booster and as a household cleaner. It's not only an effective cleaner, it is an all-natural product.  Saweet.

Vinegar
According to Vinegar Tips, White distilled vinegar is a popular household cleanser, effective for killing most mold, bacteria, and germs, due to its level of acidity. Cleaning with white distilled vinegar is a smart way to avoid using harsh chemicals. In laundry, it makes whites whiter and brights brighter.  It is also a fabric softener!  Vinegar is made from distilled corn alcohol.  Coolio.

During the series, I will blog about (and tell you whether I found it to work!) the following "recipes":
  • Dishwasher Detergent
  • Laundry Detergent
  • Fabric softener
  • Liquid hand or body soap (okay, no borax, WS, or Vinegar in that one!)
  • Foaming hand soap (yep, none in that either)
  • Carpet and clothing stain remover
  • Bathroom cleaner
Do yourself a favor and invest in:
  • 1 box borax
  • 1 box washing soda
  • 1 HUGE jug of vinegar (I bought the jug pictured for only $2.15 at Walmart)
  • Dawn Soap ( I bought the clear hypoallergenic kind!)
See you soon for some awesome cleaning tutorials!

    Tuesday, December 6, 2011

    {Knee Warmer Tutorial}

    I love boots.
    I wear my one brown pair that I got from Old Navy the year before last for $4.50 at least 3 times a week.
    I know.  I need more.

    I saw these photos on Pinterest and fell. in. love:

    Looove the sock thing.
    Problem- my boots are rather snug.  I don't think I can fit socks over leggings in there.  So, I decided to make some faux socks out of old sweaters, a.k.a "Knee Warmers".

    Here is how:

    First, grab an old sweater.  We are going to take advantage of those already-sewn side seams and finished edges.  It's practically impossible to "hem" cable knit. 

    I already cut off the sleeves and neck
    Measure your knee area and subtract a few inches- the sweater material is going to stretch.  My legs/knees were about 13 inches, so I cut my warmers to be 10 inches in width (5 shown in the picture because the sweater is folded in half).  Cut two total, one out of each side edge of the sweater:


    In order to have nice, finished edges on the inside of your warmers, we are going to sew french seams.
    Don't freak out.  They are super easy.  With wrong sides together (I know, that seems wrong- it's not), sew a 1/4in seam down the side (I serged it).

    Flip them inside out and, along that same side, sew a 3/8 in (or larger) seam.  This will "encase" that previous seam.

    Flip right side out again.  Tada! 

    Now, all we need to do is finished that bottom edge we cut (the other edge should have been the already-finished edge of the sweater).  I serged them (and used tan thread so you can see), but you can zig zag them.


    Sweet!  Put them on right before boots, leave the zig zagged edge down in your boot, like this:
    
    I look like I have the chubbiest legs ever!  Hmmm... need to work harder on that!
    
    Loooooove it, even though it looks totally homeless under neath.  Haha.
    designed with love by beautiful dawn designs