I don't think there is anything more awful when sewing than getting to the point of no return only to find out... it's too small. Grrr! The first time I made this dress, it was just a little too small. I was going to make a new one and adapt the small one into a shirt, but then I realized I didn't want a dress and shirt that were, well, the same thing. SO, I gave the smaller one away and made me a new one. In the tutorial, you will notice 2 different dresses and, well, that's why! I tell my students all the time- yes, adults and people who are good at sewing still mess up sometimes (not that I am good, but I am an adult, I hope!)
One-Shoulder Dress Tutorial
You Need:
- 1.5 Yard of fabric
- 1 yard of 1/4 inch elastic
- Thread to match
- A dress that fits you well from your closet
Okay, here we go:
- 1. Lay out your fabric on the floor, folded in half evenly. Lay your dress on top of it and pin to the fabric. Also pin "in" one of your sleeves, like in the picture. Cut around your dress, leaving about 2 inches or more margin on each side. For right now, only cut out the bottom and sides.
 |
| I realize the bottom of the dress is hanging off the fabric in the picture on the left. That is okay. We will be attaching a separate bottom piece to the dress that we will cut later. |
- Once you have cut around the sides, cut the J shape of the pinned in sleeve, then left a few inches. If you look in the previous picture, I cut to the left until the collar started to curve, which is about 2-3 inches. You will now cut from that point to where you stopped cutting right under the sleeve of the other side.
 |
| I did not leave 2 inches or more around my dress, which would be WHY it was too small. Boo. |
 |
| If they aren't even, trim so that it is. I think this is where I went wrong too- I trimmed too much! |
- Now, we are going to make the bottom piece of the dress. This will be sewn onto the bottom just like a pillow case cuff or, hence the name, a pillow case dress. The cuff will encase the seam, so you don't have to worry about finishing it. I love this! No hem or anything! It is kind of confusing, though. Trust me on this one! Lay your dress again the piece of fabric. I wanted my cuff to be about 5 inches in width, but it is folded over when finished, so it needs to be 10 inches in width. The length is the width of your dress. Take a looksie:
 |
| CUT TWO OF THESE 10 BY [WIDTH OF DRESS] STRIPS |
- Cut the ruffle strips for the top. Measure the diagonal line you cut from the shoulder to the arm pit. Mine measures 19 inches. Add 1 inch to that (which is 20..and yes, I know you know that) and cut 2 strips that are 5 inches by 20 inches (or whatever your measurement is).
- Lastly, we need a strip cut on the bias to face the arm hole. First, measure the length of the "J" of your arm hole. Mine is 9 inches. Double that and add an inch. So, 19 inches! You will need to lay down your fabric and find the diagonal line of the fabric. Fabric cut in this direction will give you stretch, which is what we need to face a curved line- aka your arm hole. Cut a piece that is 1.5 inches by 19 (or whatever your measurement is).
- Alright! We have everything cut out- here is what we have:
 |
| 2 dress shapes, 2 ten by {whatever} strips for the bottom... |
 |
| One 1.5" by {whatever} inch Bias strip and two 5" by 20 inch ruffle strips |
- Finally. We can start sewing.
- Take your two dress pieces, place them wrong sides together, and sew one side seam together, taking a 5/8 in allowance. Just one! It doesn't really matter which. And sorry, no picture. Finish the seams as you usually do, whether that's zig zag or serge. Set aside.
- We are going to take our two dress-bottom strips that were each 10 inches by {dress width} inches. Sew them with right sides together along the 10 inch sides to make one really long strip.


- Lay your strip right side down on the floor/table. Take your dress and lay it right side down also, lining up the bottom edge of the dress with the top of your strip. Pin together. (WARNING: this is the confusing part!) Roll up your dress so that it is all sitting on top of the strip. Take the bottom side of the strip and pull it up over the dress "roll" and even with the top that you previously pinned. Pin the bottom of the long strip to the top and dress bottom you already have pinned together. At school, we call this a "sausage roll". I'm sorry- it's really confusing, but look at the pictures for help:
 |
| ***Make sure the side seam of your dress lines up with the seam in your long strip. It will be noticeable- I made this mistake and had to rip it out the first time. |
You will then have:

- Okay- sew along the top edge that is pinned with a 1/4 inch seam allowance, making sure to catch all 3 layers of fabric but not any of the rolled up dress stuck in the middle. When done, unpin and pull the "roll"from the inside out one of the holes. The outside of the roll will turn inside out while you pull the dress out. You are left with:
 |
| The left seam is the one sewn together. The bottom of the dress is now "finished" and won't need any hemming, just like the cuff of a pillow case. Your right side should be open and the seam un-sewn. |
|
|
- Oui Oui-french seams! I love these seams, but they can be tricky. Seams are traditionally 5/8 in, unless otherwise noted. When doing french seams, you really sew twice and encase the seam to make it pretty. Since we are sewing twice, each seam will be less than 5/8 but will need to add up to 5/8. Keep your dress laying right sides out so you can see the pretty side of your fabric. You are going to sew a normal seam down the right side at 1/4 inch {yes, this seems backwards because you have wrong sides together. It. Will. Work. Trust me.}. Trim your seam so that your fabric is even and at 1/4 inch or less!!!
 |
| If your bottom "cuff" was wider than the dress, you can cut that off, too so that it is even. |
- Turn your dress inside out. Your fabric should not be right sides together. On the seam you just sewed, wiggle out the seam and iron it down. You want to make sure your stitching is right at the edge of the seam. Now, sewn over the seam, but this time, sew at 3/8 inch (1/4 + 3/8= 5/8!). It will look like this:
 |
| See the seam on the right? Great. When you turn your dress right side out again, if you can see anything poking out (leftovers from the first seam), you didn't take a deep enough seam the 2nd time. Rip it out and sew at 1/2 instead. |
- Sweet! Keep your dress inside out and sew/finish the shoulder seam:
 |
| AND new dress! Haha. Sorry, Guess I didn't edit these well. It's really dark! |
- So close! Turn your dress right side out. You now need your bias strip that we cut on the diagonal to create a facing for the arm hole. I'm not going to explain how to do this in words again, because you can go to my post about how to change a shirt from sleeve to sleeveless and I explain it all there. Here is what I did in pictures, though!
 |
| Apparently I didn't edit any of the yellow pictures. Ew. Oh well! |
- Alright- you should have finished the facing of your arm hole by now and you dress looks totally finished... except for the ruffle. Perfect! That's all we have left. Take your two ruffle strips and sew them together at the short ends to make a really long strip. Hem one long side by folding 1/4 inch to the wrong side, ironing down, folding up another 1/2 inch, and ironing again. Sew down.
- Turn your dress inside out. Place the raw edge of the ruffle again the raw edge of the dress with the right side of the ruffle piece down and pin all around.
- After you have pinned everything around, you should have extra fabric on that side that is not sewn together. Sew those two piece together so that the ruffle fits perfectly on the dress (they have the same circumference). Sew it at an angle, like in this picture:
 |
| Sorry- turn your head! |
- Sew all the way around that top edge with a 1/4 in seam allowance. Once finished, turn your dress right side out and pull the ruffle out and over the top of your dress. Iron down at the seam.
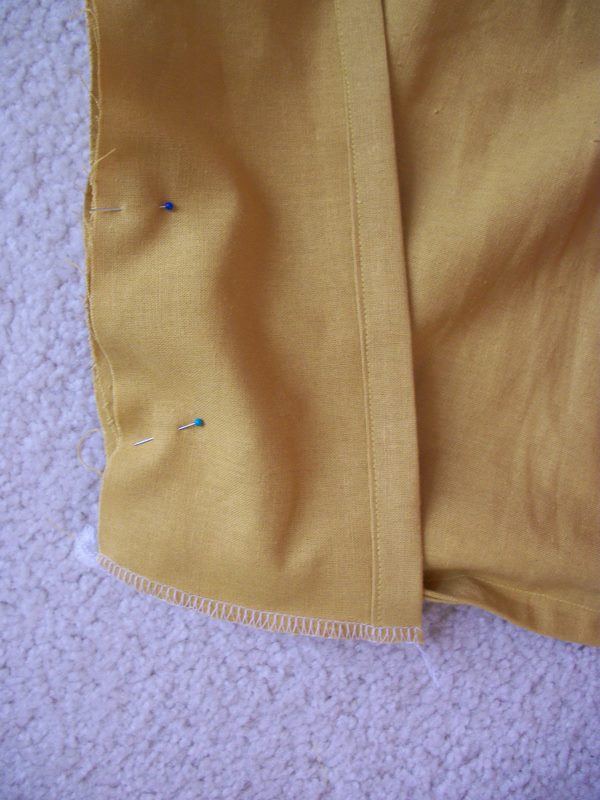
- All we have to do now is sew a casing for the elastic, and we are done! Once you have ironed down the ruffle fabric, sew along the top at 1/2 inch seam allowance, starting at the side seam and stopping to leave a 1/2 inch opening.
 |
| You can't see the opening, but I promise it is on the side! |
- Lift up the ruffle where you left the opening. Take your elastic and pull it around your body where it will lay in the dress (under one arm and over the other shoulder). Pull it tight so that it is stretching a little, but still comfortable. Cut it so that you have the elastic piece to thread through the casing we just made. Take a safety pin (or knot it on a bobby if you are cheap like me!) and thread it through one side and around another, until it comes back out the hole from the other direction.
 |
| Just kidding- there is the hole I made! |
 |
| BTW I finally found a safety pin to make the diaper covers. So. Much. Better. |
 |
| In one side.... |
 |
| And out the other! Your fabric should be ruffl-y now. |
- Overlap the two elastic pieces and zig zag them together. Stitch the hole you left open closed. If you are confused about the elastic part, visit the diaper cover tutorial and it will help!
You are DONE! So easy, simple, and cheap- mine was only $6 with the blue fabric and $8 with the yellow. Accessorize and we have:
I was able to play around with pattern making this weekend/week and sketched patterns for
diaper covers and these CUTE dresses. I am in LOVE with them!
 |
| I especially love this floral fabric. Precious. I bought enough to make me a dress with it! Ha! |
Anyway, I am starting a new dress for me using the same fabric I made pillows out of for the
basement (ha! I just love it though!) and this pattern:
I'm doing view B, which is that the model is wearing (NOT the headband. Wow. Tack-e). I really like it without sleeves, but I like the sleeves on, too, because it's something different and I won't have to worry about dragging a cardi to school with me in case I get chilled (which always happens- my classroom is so cold! Not complaining, though!). Love it! Update when I finish. =)
Etsy store is officially out of Boppy covers! Love it. What would you like to see added?


0 comments:
Post a Comment