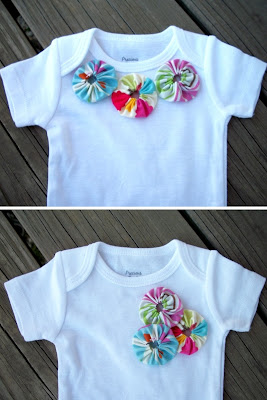
Yo Yo....YO! Check it out!
Yo yos?
What?
Yes, these little tiny circles of gathered cuteness are called Yo Yos. I just adore them. How cute are they? They are SO easy to make- I teach my kiddies how to hand sew for the first time with this pattern. We make one for the center of our pin cushions (it's stuffed with.. well, stuffing... and the hole-side is glued down.) and I thought they would be precious on a onesie for my niece-to-be Autumn =)
You need:
5 inches (less/more, depending on size) of cute fabric
1 Sewing needle
Thread to match
- First, decide how big you will want the Yoyo once you have finished. I cut circles out of notebook paper and laid them out on the onesie for visualization. Once you know the size you want, measure the diameter of the pattern circle.
- Mine measured 2.25 inches. Double this number. The doubled number will be the diameter of the pattern you need to cut for your fabric. Because we are making a little "shower cap" of fabric (this is what we call it in my classroom!), we need enough fabric to be gathered to the center and still have the diameter we want- thus, you have to double it. My new pattern is 4.5 inches in diameter.
- Cut out your cute little circles =)
- Cut a piece of thread long enough so that you can double thread and knot your needle and sew around the entire circle. I eyeballed that, so I don't know how long my thread was. Sorry! Place your circle on the table with the wrong side facing you. Fold the edge towards you 1/4 inch. Sew a running stitch all around the circle, folding as you go. You want to sew as close to the folded edge as possible.
 | ||
| I put my needle through several stitches at a time and then pull the needle through. It is so much faster! |
- This sounds backward, but the looser or farther apart you sew your stitches, the smaller the hole will be- or the more room there is to pull your stitches together. If you sew your stitches really close together, your "gathering hole" will be rather large. You don't want that! Sew loose stitches- it looks better and is faster!
- Once you have finished sewing the entire circumference of the circle (man, this tute is full of math vocab!), it should look like this:
- Do not knot your needle thread! Take your needle and gently tug towards you so that the stitches gather. Once completely gathered, they will make a little "shower cap".
- Knot off and cut your threads. Finished! Stitch to a onesie, shirt, or headband (I made a matching headband but it's not pictured!) and you have one cutie pie of a baby!
 |
| Neckline or corsage? So many options. I think I'm going with the neckline. |


Aww..so cute...love the prayer, too!! :) Thanks for linking up to Crafts for Under Twenty Something!! Featuring you on facebook...https://www.facebook.com/pages/Bear-Rabbit-Bear-Craft-DIY-blog/147483145329051
ReplyDeleteMelanie
bearrabbitbear.blogspot.com
Beautiful! I found you at Bear Rabbit Bear craft party. Thanks for sharing :)
ReplyDeleteVanina
mother crafter ~ handmade happiness
http://mothercrafter.wordpress.com/
Very Very Cute!! found you on skip to my lou!
ReplyDeleteHope
www.hopesewell.com
Hi! I did your yo-yos this weekend and featured them today on my "What We Did This Weekend" segment! Thought you'd like to know!! http://bearrabbitbear.blogspot.com/2011/09/what-we-did-this-weekend-yo-yo-tutorial.html
ReplyDeleteMelanie
bearrabbitbear.blogspot.com