
I bought this shirt at Walmart {when I was supposed to be buying groceries for school while on my plan period- which I did!} in the Spring for $3.
Did ya get that?
$3.
I liked it so much, I bought another one in another color. I wore a tank underneath and tucked it into some high-waisted trousers. Cuuuuute.

Well, I decided that having 2 exact shirts in the same print wasn't very fun. What could I do with it? Nothing too spectacular- just turn it into a tank!
I did this at the beginning of the summer with a shirt I found at Goodwill. I love it! Hemming the new arm holes, though, was a pain in the rear because I did not want to buy or use bias tape and I didn't have enough fabric from the sleeves to make some. When I made my maxi dress in Charleston with my mom, I honed an easy technique that I am going to show you to face both arm holes and necklines. Readdddy? Go!
From Sleeves to Sleeveless: How to Turn any shirt into a Tank
- First- you have a shirt. Cute, obviously, because you bought it for some reason. Cut off the sleeves right at the seam where they were attached. Be very careful! I actually then cut my sleeves a little deeper so that they came into my shoulder and didn't look like one of those I-want-to-look-cool-and-cut-off-my-sleeves-to-make-it-look-like-I-work-out-but-I-really-don't or I-work-out-isn't-my-sports-bra-cute shirts. No thanks.

- Now we need some strips of fabric to "face" the curves of the sleeves you just cut- otherwise, your shirt will fray and eventually disappear into thread. SO (this is going to sound odd and hard, but I promise it is easy!), take the sleeves you cut off and cut in a "tornado" motion all the way up the sleeve, starting at the bottom. You should end up with a strip of fabric that is rather long and about an inch wide. Woven fabric naturally does not like to curve. If we cut on the diagonal-or the "bias"- the fabric will curve the way we want it to. So, tornado cut it up. You need 1 strip from each sleeve and should only be cutting through ONE layer of fabric at a time.

- We are now left with:
 |
| Stripz. |
- Measure the circumference of your sleeves on the {now} tank. Say you measure 19 inches. You strip needs to be 19 inches + your seam allowance (x2). So, I sew a 1/4 seam allowance, so I will need to factor in an extra 1/2 inch (1/4 X 2= 1/2) into my sleeve measurement, which is 19. My strips need to be 19.5 inches long. Trim them down so that they are.
- Mosey on over to your ironing board and iron the strips in half hot dog style with wrong sides together. Did you get that? Wrong sides together.
 | |
| Love my wrang =) |
- Open up the edges of each strip and sew the ends together to make a circle. You should have right sides together when you sew! Then, fold the fabric where it naturally wants to fall (since you already ironed it) and you should have a loop/circle that is ironed in half, right sides on the outside.

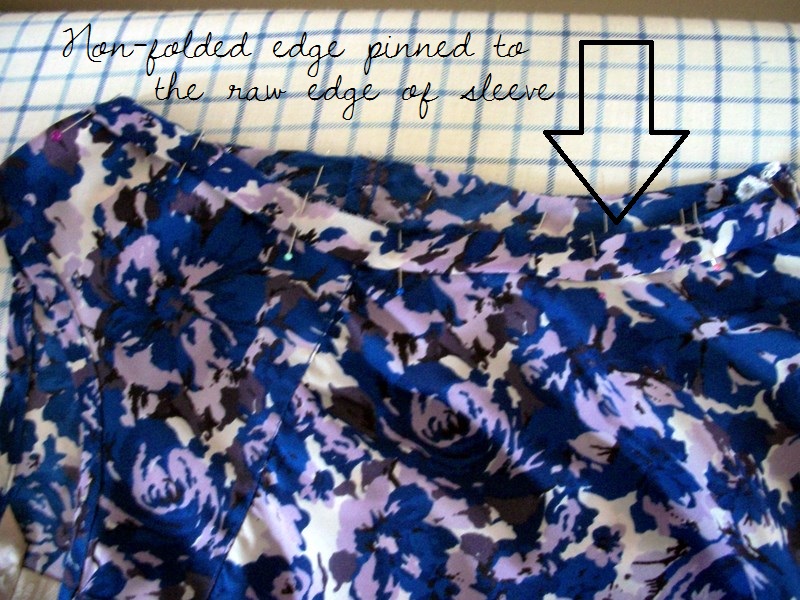
- We are ready to pin! Take your tank top and lay it on the table or ironing board right side out. Take your fabric loop and line up the non folded edge against the edge of your cut (or "raw") sleeve edge. in in place. Pin all around the sleeve until your loop in pinned to your shirt- again, with the cut edges of the loop {not the folded edge} pinned to the raw edge of your sleeve!
 |
| Start pinning at the bottom of your sleeve. |
- Sew around the sleeve with your sewing machine along the raw edge (not the fold). I usually sew as close to the edge as possible- like 1/8 inch, as such:

- At this point, your shirt should be right side out. Take the facing strip you just sewed to your shirt and turn it over, away from your shirt. Turn it again so it is on the side of your shirt and iron it down.

- Then, turn your shirt inside out. Your strip should be turned to the wrong side and covering the seam you just created. Sew the folded side down to the shirt (we already sewed the raw edges of the strip down to the shirt) as close to the edge as possible:
 |
| This is the view of the last step when your shirt should be inside out. See how the strip covers my seam? Sweet. |
- Annnnnddd... Taddddda! Tank top.

Before and after:
 |
| Yep, I thought you needed to see it twice. |
No need to buy new clothes when you can repurpose some old ones. Cost? 3 buckaroos.
ingredients
Tacos:
- 1-1/2 lb. thawed chicken breasts (or cod or halibut fillets, thawed) and cut into 1-inch pieces
- 2 fresh tomatillos, cut into 1/2-inch pieces (2 cups)
- 2 tsp. olive oil
- 1 clove garlic, minced
- 1/2 tsp. finely shredded orange peel
- 1/2 tsp. finely shredded lime peel
- 12 6-inch corn tortillas
- Salt and Pepper
- Chili Powder to taste
Slaw:
- 5 oz. green cabbage, thinly shredded (1-1/4 cups)
- 1/2 cup thinly sliced red onion(left out because of Daniel. Would have enjoyed them!)
- 1 poblano pepper, halved crosswise, seeded and thinly sliced
- 1 carrot, peeled and shredded
- 1/4 cup chopped fresh cilantro
- 3 Tbsp. olive oil
- 1 Cloved Garlic, Minced
- 2 Tbsp. freshly squeezed lime juice
- 1 Tbsp. freshly squeezed orange juice
Directions:
1. Preheat oven to 400 degrees F. Unpeel tomatillos from husks (FYI, you want tomatillos to have dry, tight fitting husks. I tasted it- it was like a lemony hard tomato. Perrty good. After the husks come off, they will be sticky. Rinse!) and cut into 1/2 inch pieces. Also zest your lime and orange, but keep the fruit. The juices go in the slaw!

1.5 In bowl toss together Chicken/fish, tomatillos, oil, garlic, orange peel and lime peel. Season with salt and black pepper and chili powder; set aside.
Inside of a tomatillo. Who knew?

IF using fish:
2. Cut six 12-inch-square sheets of foil. Place one-sixth (about 2/3 cup) fish mixture in center of each square. Fold diagonally in half in a triangle. Fold edges two or three times to make a packet. Place packets in single layer on a large baking sheet.
3. Bake fish 10 to 12 minutes, until packets puff slightly (carefully open a packet to check fish doneness; fish should flake easily with a fork). Meanwhile, in dry skillet warm tortillas over medium-high heat until soft, about 15 seconds per side.
IF using chicken:
2. Put meet mixture into greased 9*13 pan and bake uncovered until meat is cooked through- about 25-30 minutes. I broil the last 10 minutes to get some color =)

4. To serve, divide meat mixture between tortillas. Make sure they are warmed through first! Otherwise, they will break in half when you fold them.
5. Top with Cabbage and Chile Pepper Slaw. Serve immediately. Makes 6 servings (4 in the Gibson world).
Aldi. $1. Bam.
Cabbage and Chile Pepper Slaw In a medium bowl combine cabbage, red onion, poblano pepper, carrot, and cilantro. For dressing, in small bowl combine olive oil, lime juice, and orange juice. Season with salt. Toss with slaw.

I just used a slaw mix because it's the same thing, was on sale, and already had the carrots in there. There's my cilantro and pepper and fruits to juice!
Done! So easy. And, we have:
Finished Slaw!

Dinner! Served with fresh green beans and cherry tomatoes. This recipe is a must! So fresh, healthy, and inexpensive. My husband loved it despite my threats to "make [him] eat whatever I put in from on [him]. Give it a try and leave a comment about how your family liked it!


I love your "cool" shirt re-do! I'm just getting into refashioning and I think it's addictive! :)
ReplyDeleteWow!!!! The transformation is fabulous! I wish it were in my closet! I may have to copy-cat you b/c I too am really getting into refashioning. LOVE your blog btw!!!
ReplyDelete